ClarkVision.com
| Home | Galleries | Articles | Reviews | Best Gear | Science | New | About | Contact |
Astrophotography Made Simple
by Roger N. Clark
| Home | Galleries | Articles | Reviews | Best Gear | Science | New | About | Contact |
by Roger N. Clark
Astrophotography need not be the complex process commonly taught on the internet!!! With modern digital cameras, this complexity is NOT NEEDED, and in fact may produce a worse result with the traditional workflow. The first thing one may learn via the internet is to measure calibration frames and take more exposures. Then special software is run to make a final image. Many steps are required, including subtracting bias and dark frames, correcting with "flats," color calibration, green reduction, histogram equalization and on and on. The basic sensor calibration that amateur astronomers talk about are the same steps needed to produce any image out of a color digital camera, including daytime landscapes, portraits, sports or wildlife photos. The traditional astro work flow will not produce good everyday color images, not even as good as an out-of-camera jpeg from a smartphone! I advocate a simpler modern method for astrophotography that allows one to produce very good images with a modest amount of time and equipment, with better color and a more complete calibration than done with a traditional astro work flow.
The Night Photography Series:
Introduction
Keys to Simpler Astrophotography (Summary)
Keys to Simpler Astrophotography (Details)
A Simpler Modern Work Flow
Stretching Made Simple
Summary: Astrophotography Made Simple
Examples Showing the Modern Workflow is Better
The Traditional Workflow
Sensor Calibration Data: Light Frames, Dark Frames, Bias Frames, Flat Fields
Types of Noise
Example Improvement from Old Technology to Simpler New Technology
Extra Simple Astrophotography Post Processing
Discussion and Conclusions
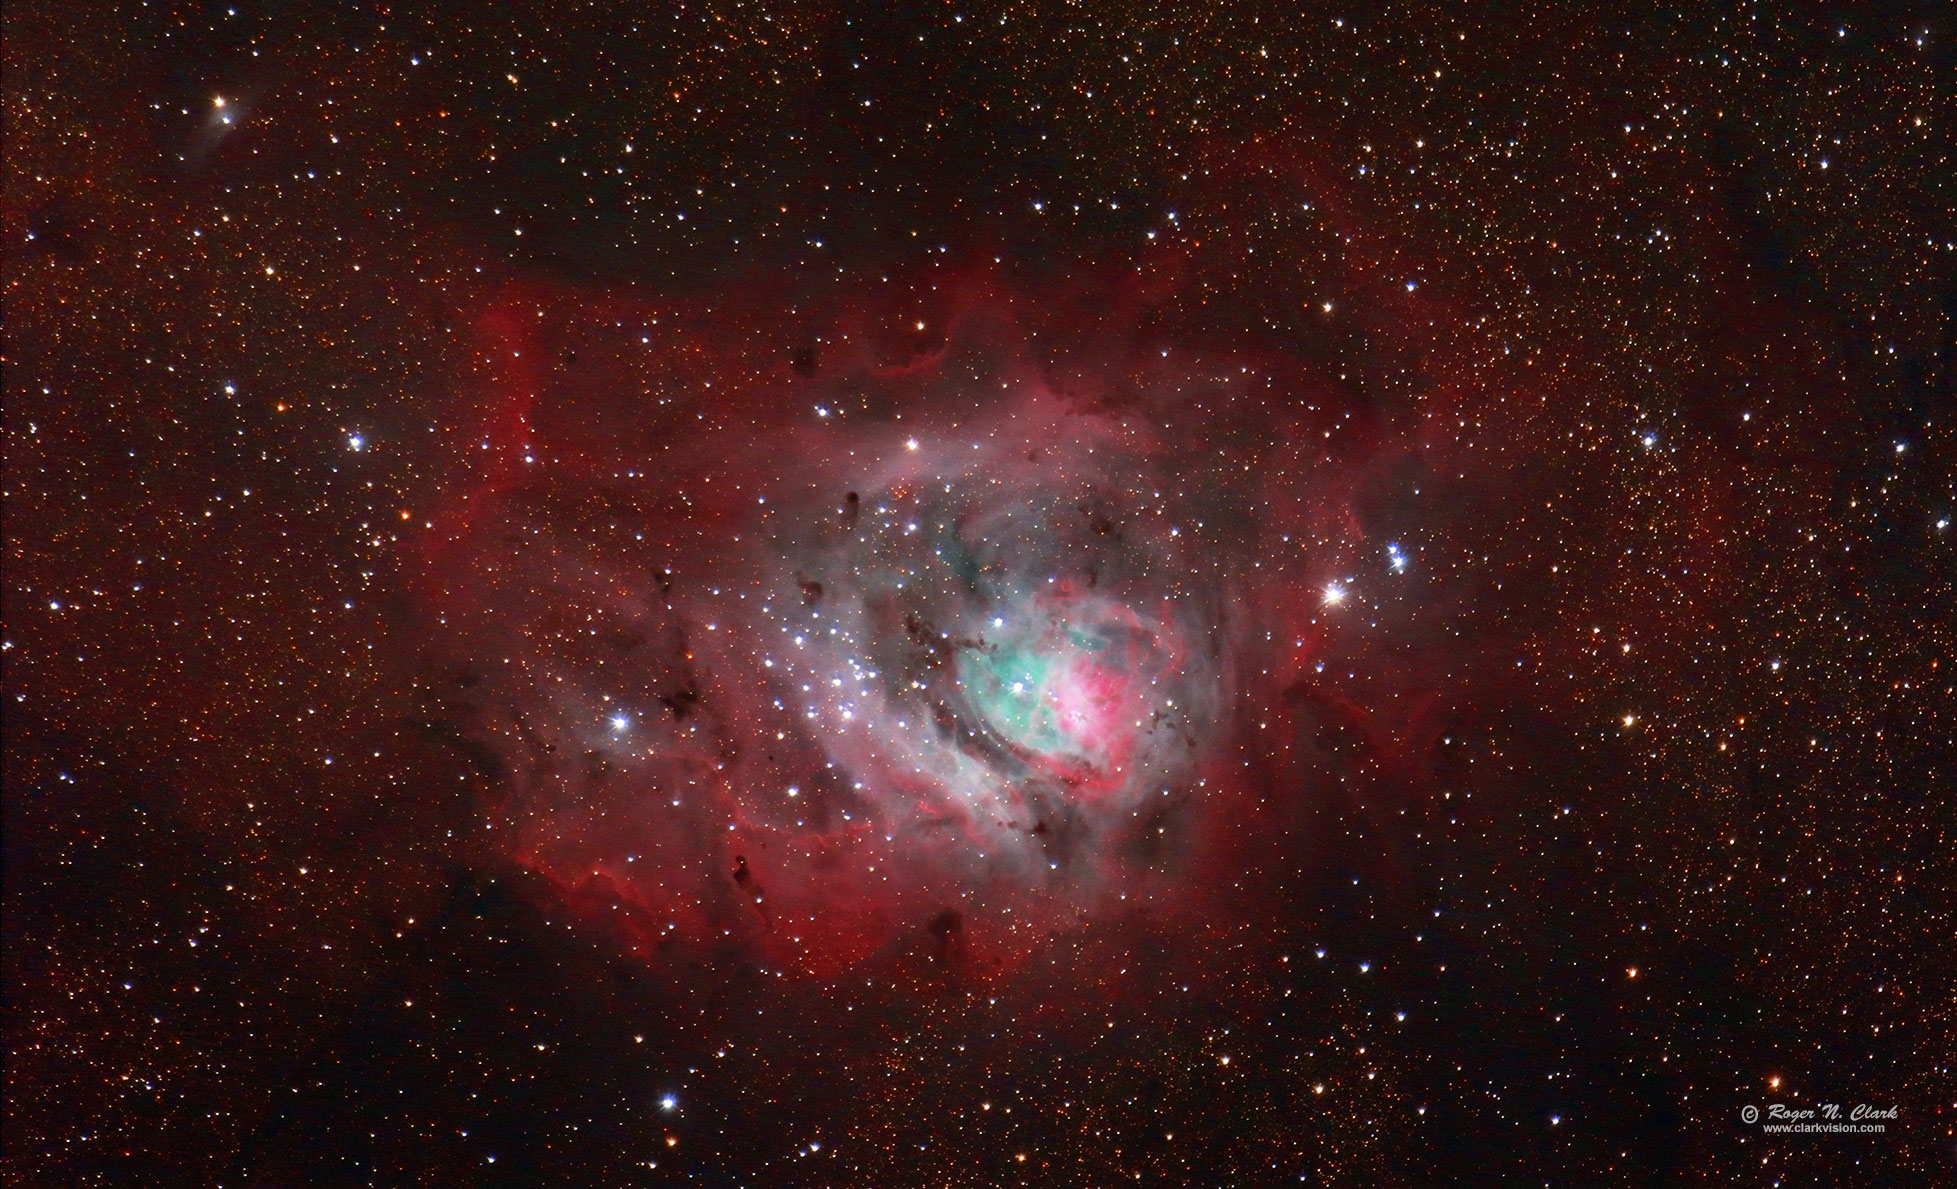
Appendix 1 Sample Images: NASA APOD and Images by Others Using Modern Methods
The engineers and digital camera manufacturers have been striving to make the images from a digital camera very high quality. This means that if you use modern digital cameras, and modern software and methods, you can produce superb images with less effort, including astrophotos. In this article I will explain how.
In the early days of digital imaging, e.g. 1970s, 1980s, and 1990s, images from a digital sensor had a lot of artifacts, and to get rid of those artifacts, a lot of steps needed to be taken. For example, measuring electronic offsets (called bias). In long exposures, another offset increased proportional to the exposure time (called dark current) and that needed to be corrected. The pixel to pixel uniformity was insufficient, and that too needed to be corrected by measuring an (ideally) uniform brightness field (called the flat field). When color digital cameras were designed (the Bayer color matrix was invented in the 1970s) the color from a digital camera also needed to be calibrated, e.g. so that the colors out of the camera of a white reference illuminated by the sun would come out white. But the tiny color filters on each pixel, just a few microns in size did not match the color response of the eye, so another correction was needed to produce good color. Frankly it is a mess. The amateur astrophotography community espouses taking calibration data to fix most (but not all these problems). This method, I call the traditional workflow, and dates from the 1990s and before.
The corrections described in the above paragraph are also the corrections needed to be done from every digital camera image, whether DSLR, mirrorless, or a cell phone camera. But no one measures calibration frames (bias, flats, darks) and applies the corrections to everyday images, e.g. landscapes, portraits, sports and wildlife photography. Yet they come out great! Why is that?
The digital camera manufacturers, engineers who design the sensors and electronics and the software developers who design the raw converters (in camera or for your computer) know these steps too and have been working to improve the workflow to make well-calibrated images out of camera and from raw converters. In other words, the engineers and camera manufacturers have been working to make digital photography simpler! This is being done at both the sensor level as well as camera internal processing, and in post processing of raw data. As a result, many of the steps in the traditional workflow are no longer necessary to be done in post processing, and not only that those steps can introduce additional noise. The modern workflow that I advocate is a simpler method for astrophotography that takes advantage of new technology developments and allows one to produce very good images with a modest amount of time and equipment, with better color and a more complete calibration than done with a traditional astro work flow.
In this article, I will describe the steps needed to make astrophotography simpler and I'll point to other articles with more technical details while trying to keep this article simpler. There is more to making astrophotography simpler than just a modern camera. Keeping things simple means selecting the technology that enables simplicity. That includes camera, lenses, tracking mounts, and software to process the data. And important too is the strategy one employs to acquire and process the images. The choices to make everything simpler are not what is typically recommended by the prevailing astrophotography community.
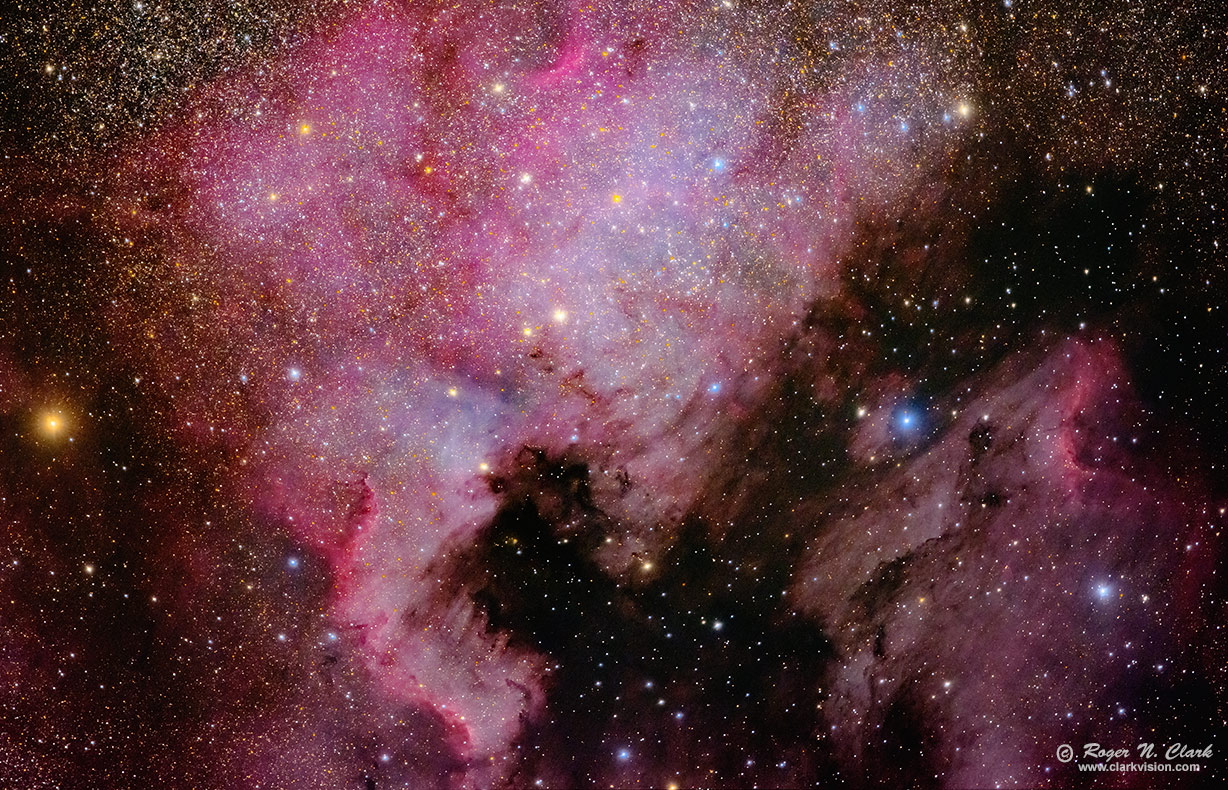
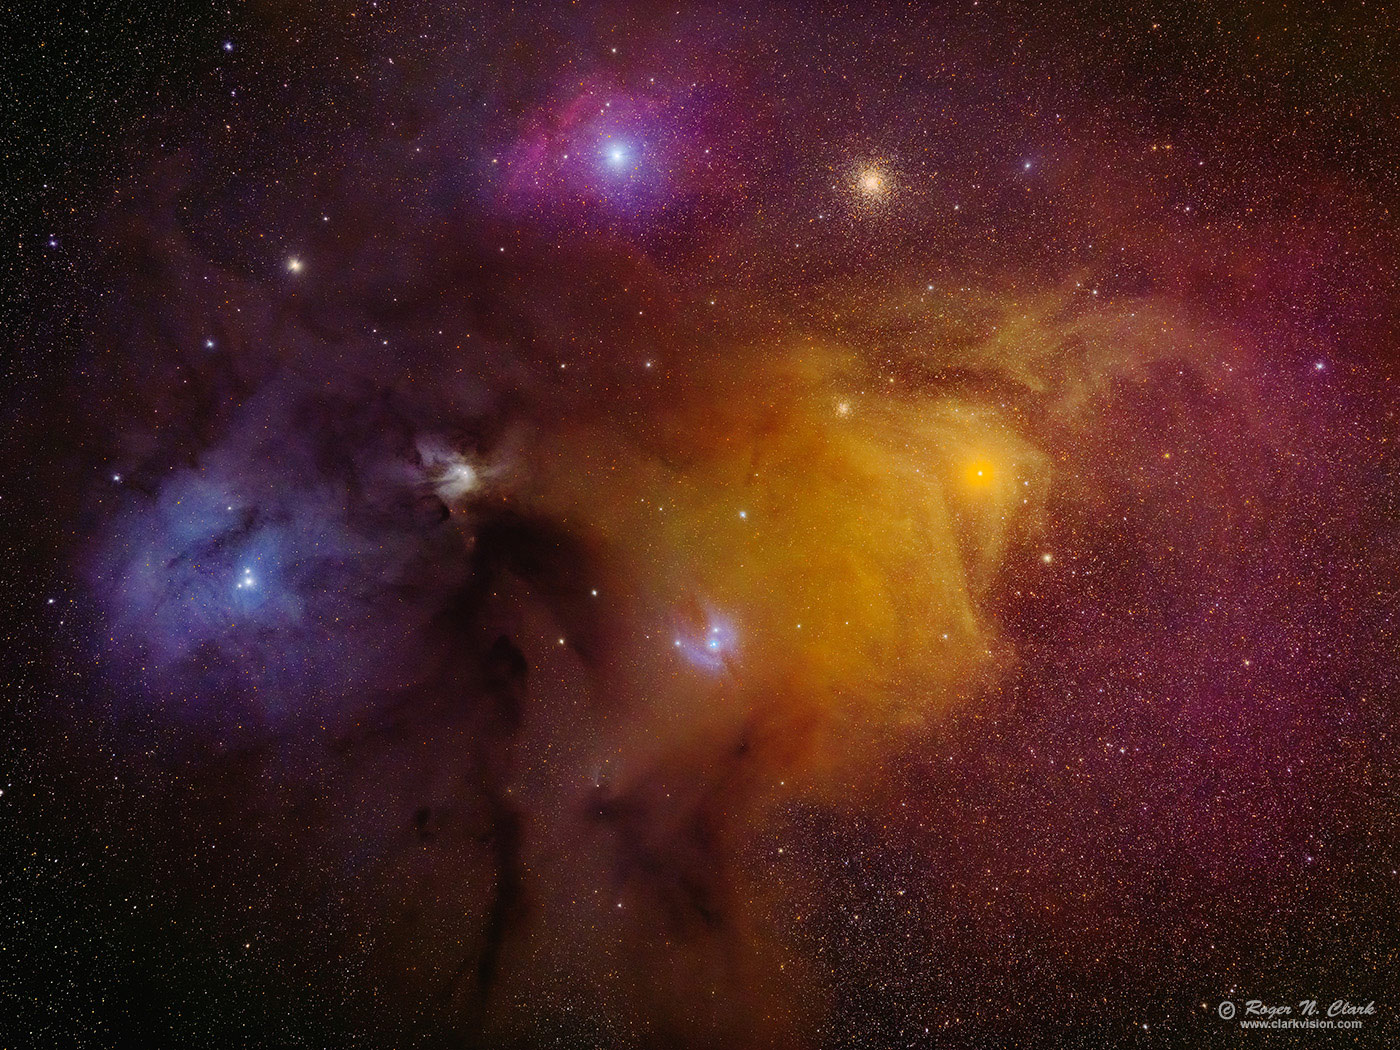
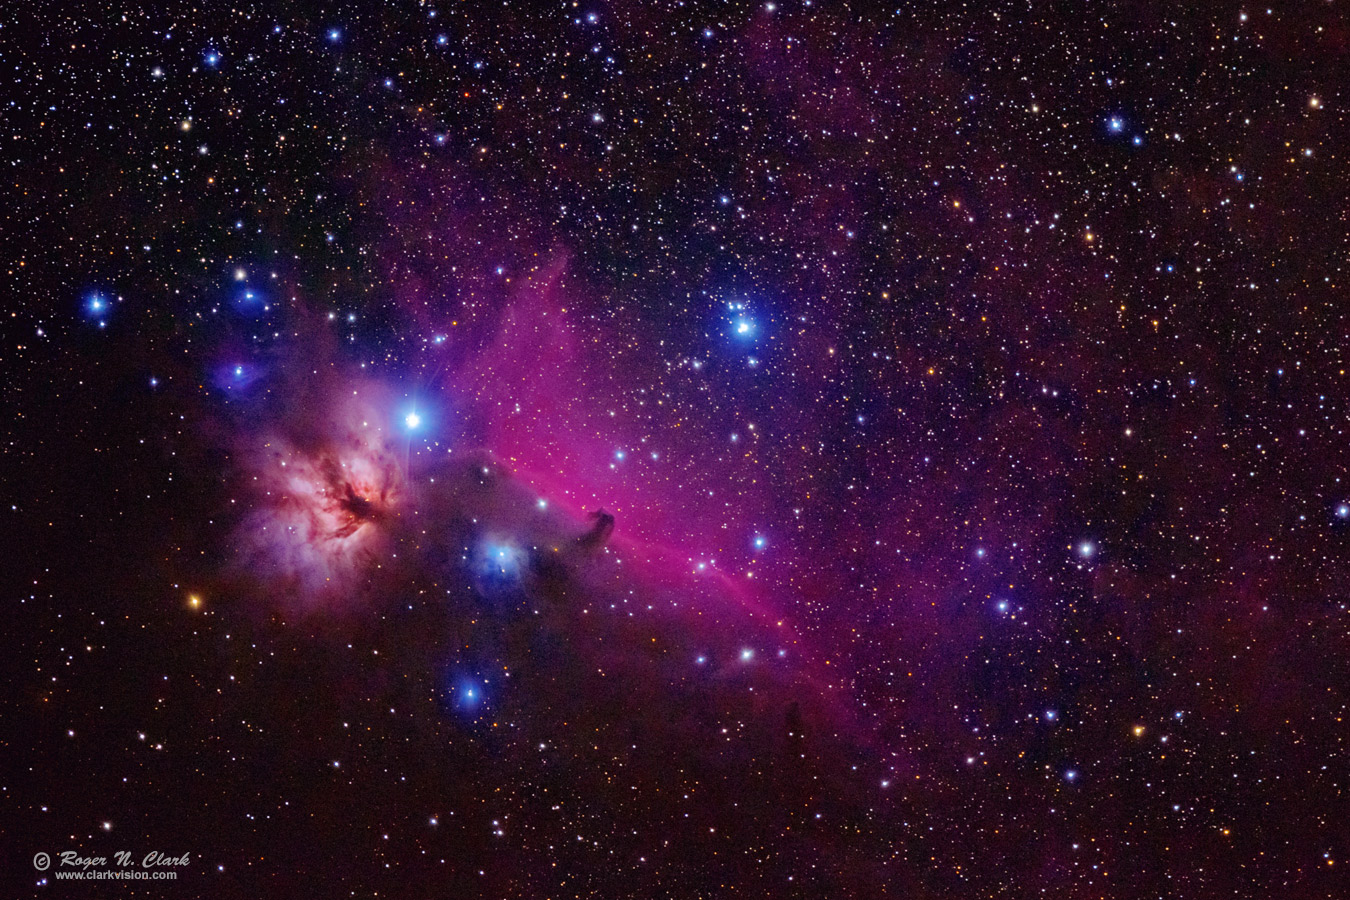
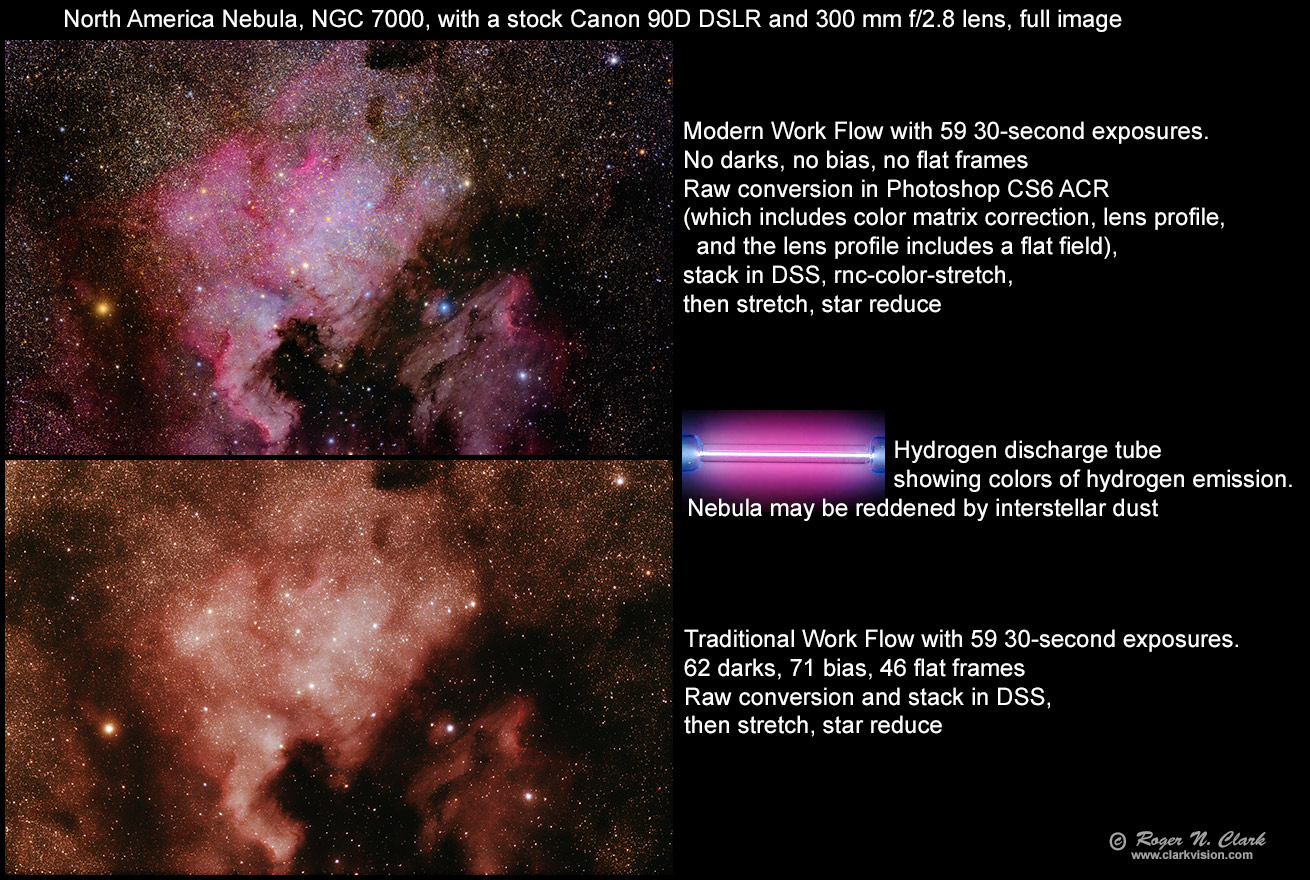
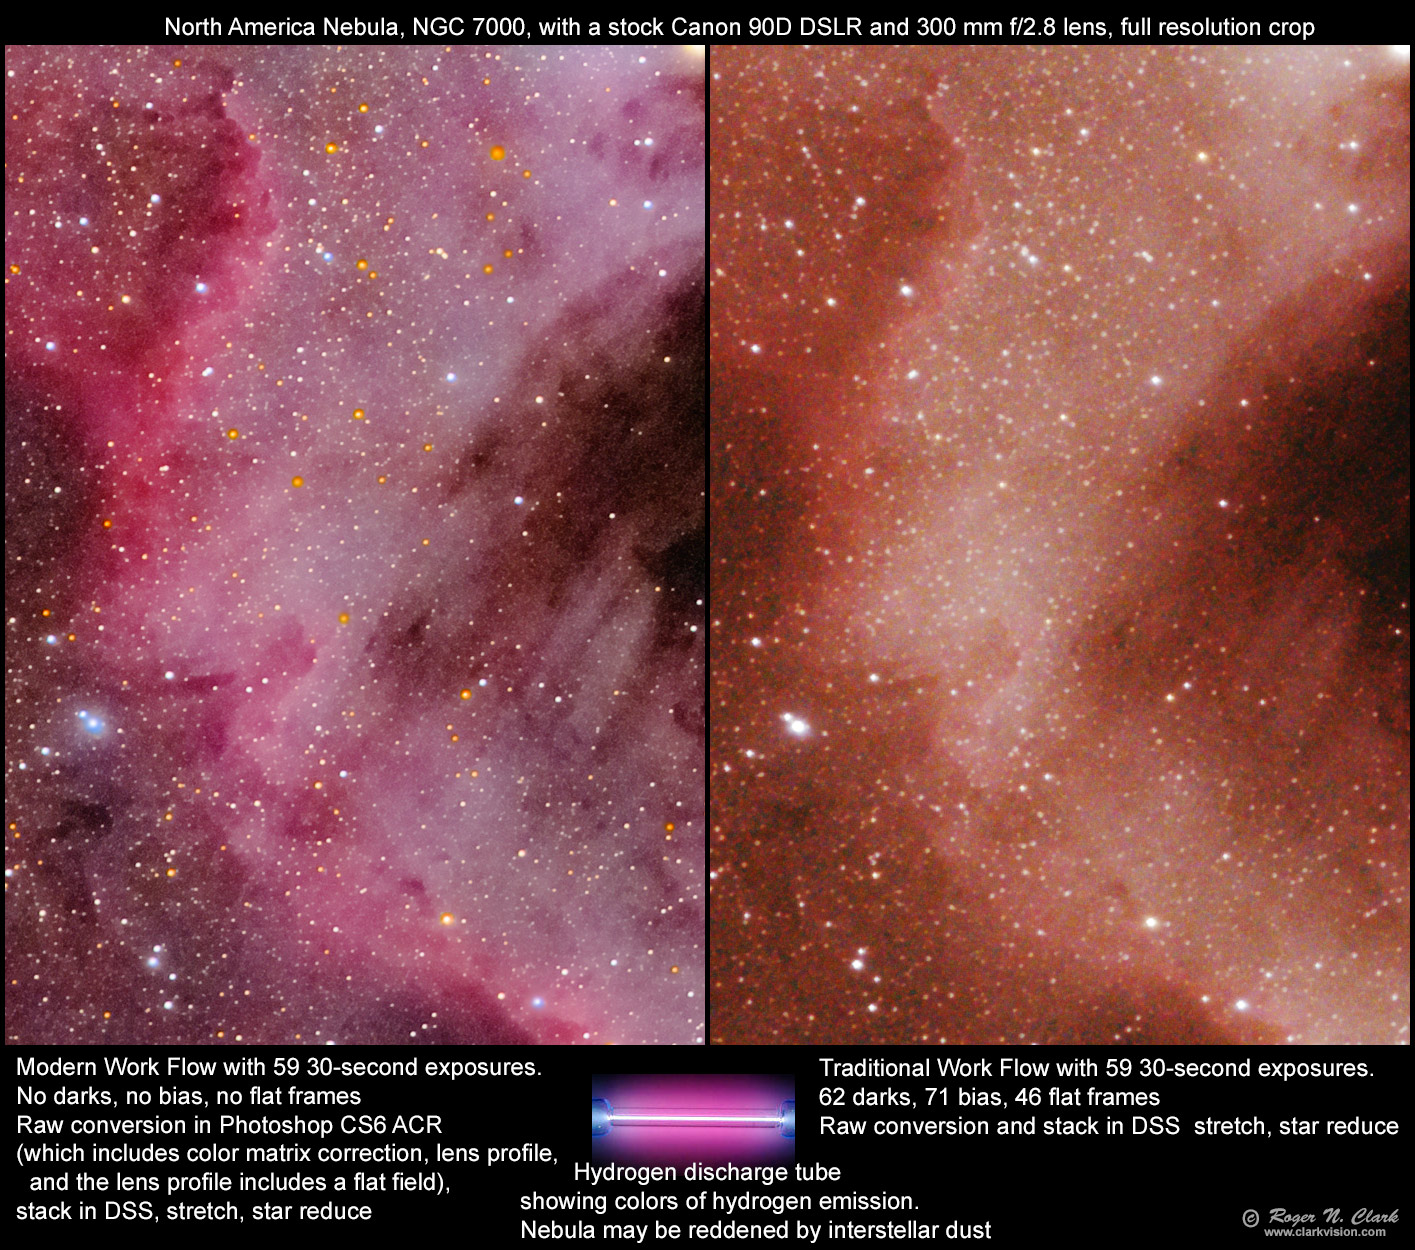
Figures 1, 2a and 2b show examples of images made with this simple approach using newer stock digital cameras and stock lenses. The method uses simple acquisition using tracked exposures but no autoguiding, no computers in the field, and high portability with simple setup. It also used no measurement of calibration frames because they are not needed! Post processing used a basic 5-step process: 1) raw conversion, 2) stack (aligns and averages multiple exposures), 3) stretch with a color preserving method that also subtracts light pollution in one step, 4) star size reduction, and 5) touch up in a photo editor. The exposure times to produce such images is also less than typically used for the traditional workflow. That is because the post processing raw conversion software uses newer algorithms that produce sharper images with less noise. The technical advancements of the last few years enable this quality and simplicity.
Below is a summary for how to make astrophotography simpler. Details as to why follows in the next section, but these have the most technological development to make astrophotography simpler..
This section gives the why and points to other articles with more details.
The main reason to choose stock camera is because the color calibration is excellent. Accurate color requires a number of steps skipped in the traditional workflow typically taught on the web. This requires a color matrix correction that is specific to each sensor. If you use dedicated astro cameras, or modified cameras, the color calibration is poor and the traditional astrophotography workflow does not include that calibration. Stock cameras have better calibration than modified or dedicated astro cameras, and the modern workflow makes more accurate color production simpler. More details at: Sensor Calibration and Color.
Digital cameras continue to improve even over the last few years. Key improvements include better Quantum Efficiency (QE), lower noise floor, lower dark current, better low signal uniformity, and lower pattern noise. Avoid cameras that filter raw data. Mirrorless cameras and shutters: choose camera models with a shutter. If there is no shutter, the sensor is exposed and will attract dust. Choose models that have a self-cleaning sensor unit (ultrasonic vibration of the filters over the sensor). Circa 2008 a new pixel design started to be introduced in consumer digital cameras that reduced the effects of dark current. It is called [On-Sensor Dark Current Suppression Technology. Camera models from the last 3 or 4 years show significant improvements over earlier models and have better low light uniformity, low dark current, excellent dark current suppression technology and more models with flip-out screens to better dissipate heat. More info at: Characteristics of Best Digital Cameras and Lenses for Nightscape, Astro, and Low Light Photography. Note: this is not a list of specific models, but what to look for in a camera.
To make post processing simpler, use stock camera lenses. The raw converters with stock camera lenses include a flat field correction (corrects light fall-off). This makes post processing simpler, and one does not need to measure calibration frames (darks, bias, and flats). If you use a telescope, the you'll need to do a far more complex traditional workflow, and if you want to have accurate color, fill in the mission steps in the traditional workflow. More details at: Sensor Calibration and Color.
If you want to go up in focal length to get more detail, look at the periodic error in the mount. The lower cost mounts use small gears typically have high periodic error. For example, the Nyx barn door tracker has 115 arc-second periodic error (from the web site). With a 200 mm lens and camera with 4 micron (0.004 mm) pixels, the pixel size is 206265 * 0.004 /200 = 4.1 arc-seconds. The periodic error typically runs from 1 to several minutes, and effectively means your exposure times must be much shorter than that. The popular Star Adventurer 2i has periodic error on the web reported in the 50 to 80 arc-second range.
A solution to using mounts with high periodic error is to employ autoguiders. But this adds a lot of complexity. An autoguider adds expense, weight, the need for a laptop to run the computer, and that also requires more power, which means larger battery if at a remote location.
The tracking solution to make astrophotography simple: There is another class of trackers that have very low periodic error: tangent arm trackers. Two models are in common use: Astrotrac (no longer in production but can be found used), and the Fornax Lightrack II (in production). The astrotrac has an effective gear diameter of about 600 mm (24 inches) and the Fornax Lightrack II about 430 mm (17 inches). The Fornax also doesn't use a drive gear, instead a roller bearing, and has a periodic error of only 2-arc-seconds peak-to-peak. The tangent arm trackers are also ultra portable. Here is my setup that shows both the Astrotrac and Fornax trackers. I use the Fornax at up to 600 mm with 1.1 arc-second per pixel and no autoguiding. Here is my astro gallery and I give the equipment used for each image, and most images were made with stock cameras and stock camera lenses.
The problem with the light weight tangent arm trackers listed in the above link is susceptibility to shake from wind. Also, they are very simple and one must find deep sky objects by hand, by learning the constellations so you know where to point. But there is a new class of trackers that maintain portability but add stability against wind shake, can carry heavier loads, and have goto capability enabling the mount to be commanded to go to a deep-sky object from a hand paddle (or computer interface), and have low tracking error. This game-changing technology is the strain wave mount with high resolution encoders. See: Tracking Mounts for Deep-Sky Astrophotography for details.
Tracking Secrets. Common on the internet is to recommend making exposures as long as possible. Some even say ten+ minutes per exposure, then take many exposures and stack them. The disadvantage of long exposures are 1) tracking errors destroy fine detail and make stars not round, and 2) reduced dynamic range. With longer exposures, the sky background gets brighter from light pollution and airglow (collectively called skyglow). That increasing signal has noise that is the square root of the signal, and that reduces dynamic range. Very short exposures have a higher proportion of read noise from the sensor contributing. So there is a balance, but the balance is changing. In the perfect sensor with zero read noise and zero pattern noise, one could take video and do lucky imaging on deep sky objects, and even collecting one photon every 100 frames on average you could still make a great image; one just needs to collect enough photons for a decent signal-to-noise, S/N, ratio.
Now, sensors aren't perfect, but they are getting pretty amazing, with read noise in the 1 electron range. With read noise this low, and similarly low pattern noise of modern digital cameras, short exposure times can improve image quality by having higher dynamic range and better rejection of all the satellites now in the sky. But pattern noise is not zero, and there is a simple trick to reduce that pattern noise. It is called dithering. But dithering is usually associated with computer controlled tracking. After each exposure, or after several exposures, the field of view is offset a few pixels in random directions so that the fixed pattern noise averages out, producing a clean image. One can also dither without computers by offsetting manually, but that gets tedious if done often.
Simple Dithering and Walking Noise. A simple way to dither is to have slightly imperfect polar alignment such that for every exposure, the field of view shifts by a fraction of a pixel. But knowledgeable astrophotographers will raise a red flag, saying that will cause what is called walking noise. Walking noise happens when there is a fixed pattern and the direction of change is constant. For example, say a pixel tends to have a higher value than surrounding pixels. As the field of view shifts, that bright pixel makes a line. But here is the beauty: walking noise only happens if there is fixed pattern noise. With good modern sensors, fixed pattern noise is small. This article, Stacking with Master Dark vs no Dark Frames illustrates various ways walking noise can be a problem. But look at Figure 16 of the article, which shows real data from a 9-year old camera, a Canon 7D Mark II. Panel A shows walking noise with 1 pixel drift per frame and 100 frames averaged. While there is very faint walking noise, which by itself would not be noticeable in the typical deep astrophoto, the walking noise can be mitigated by an occasional offset every 15 to 30 minutes. Another way to mitigate walking noise is to instead of doing an offset, do a rotation of a few degrees. If the framing of your target doesn't require the rectangular shape covering all of the frame, a rotation of a few degrees up to 90 decrees solves the dithering problem.
Summary Tracking Secret to Minimize Pattern Noise. Using a modern camera with very low pattern noise, set the polar alignment to be slightly imperfect such that for the exposure time you will use, drift is a fraction of a pixel per exposure. This keeps stars round but the pixel to pixel offset is a form of dithering. Then occasionally, do an offset approximately orthogonal to the direction of drift. In a 45 minute exposure series, doing 1-minute exposures, I might do the dither offset 1 time, or at most 2 times, or maybe do a small rotation once. The effectiveness of this method is illustrated in Figure 3.
Free open source software:
rnc-color-stretch.
The rnc-color-stretch subtracts skyglow and stretches the image in one step, as illustrated in Figures 4a, 4b, with controls for reducing noise. Other programs, like Siril have color preserving stretches, but background subtraction is a separate step.
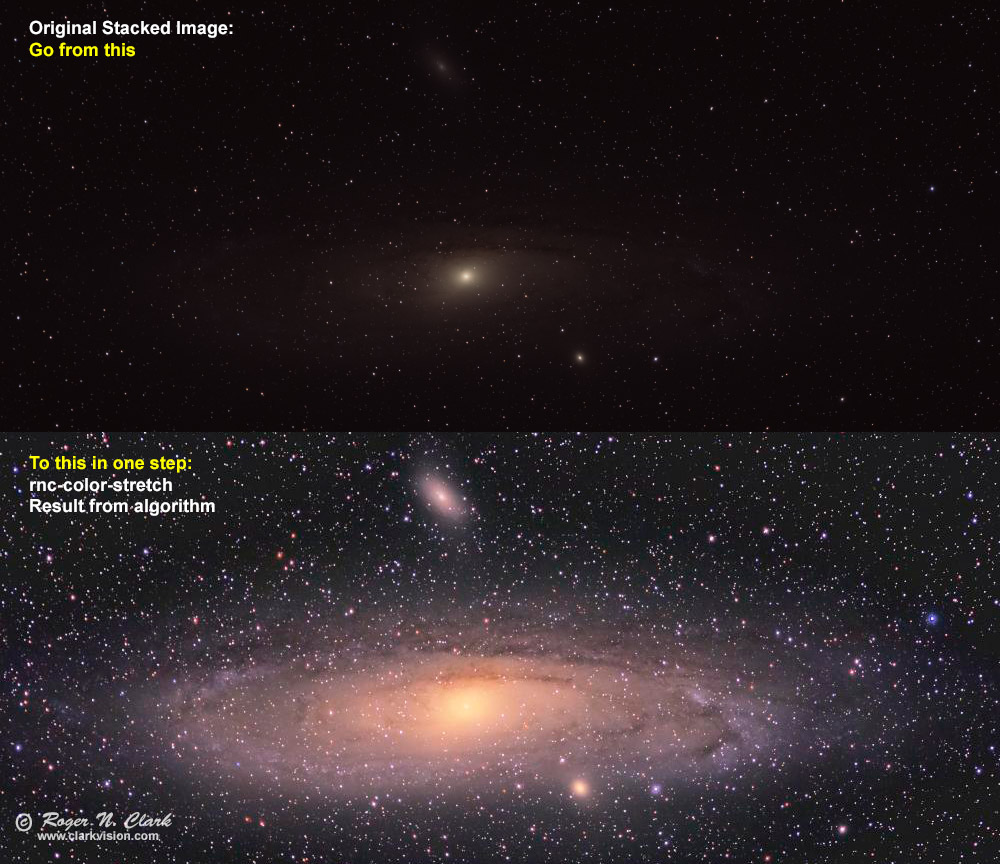
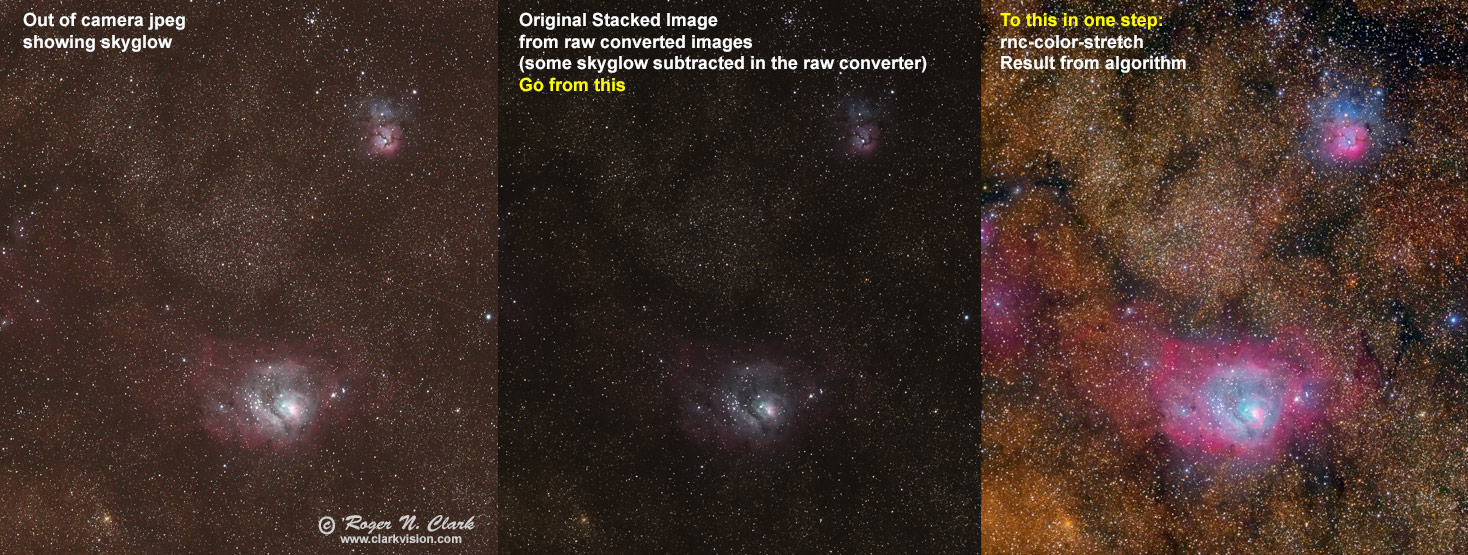
A simple demonstration to compare which method is better is to process the same data with both the modern and traditional work flows. This is shown in Figures 5a, 5b,. 5c. It is clear that the modern workflow produces better color, lower noise, and finer detail.

Additional comparisons can be found in the article. Sensor Calibration and Color. Figure 10 in this article shows that by using rawtherapee for raw conversion, one can gain approximately 10x lower noise than with the traditional workflow. That is equivalent to 100x longer total exposure time!!!!!!
People new to astrophotography are taught to obtain all kinds of data to calibrate their images, with terms like lights, darks, bias, flats, flat-darks, flat-bias, and to obtain many of each, all thrown into astro processing software that "calibrates" the data. The output then needs to be brightened and contrast improved to see an image of your target. Then, typically, other enhancements, including saturation enhancement (because the colors out of this process are not very good). Often taught are other processing steps like histogram alignment, or histogram equalization, that are actually destructive to color, shifting color as a function of intensity in the scene. In this article, I'll compare the astro work flow with everyday photography work flow, and show with less work how to make beautiful images with better and more consistent color.
The modern method that I describe uses modern digital camera raw converters to produce a color image, exactly the same as one would do for a daytime landscape image, or a portrait of a person. But astrophotography has an added problem: light pollution and airglow is an unwanted signal. It is like making a daytime landscape photo on a foggy day, but the fog is strongly colored and you want an image of a clear-day view with no fog or haze.
The calibration of a color digital camera image requires many basic steps, and the traditional astro work flow skips two critical ones. The steps include 1) bias correction, 2) dark subtraction, 3) demosaicing, 4) flat field correction, 5) distortion and aberration correction (optional), 6) white balance, 7) color matrix correction (critical, skipped by traditional work flow), 8) tone curve, and 9) hue (tint) correction (skipped by traditional work flow). Modern digital cameras with modern raw converters, like Rawtherapee, Photoshop, Lightroom and others, include all the calibration steps, including critical ones skipped by the traditional astrophotography work flow.
SKIPPED:
Color Matrix Correction (typically NOT DONE in astro-processing, but can
be an added manual operation) Hue (tint) correction (typically NOT DONE
in astro-processing).
Random noise is seen from several sources, including noise in the light signal itself, equal to the square root of the amount of light collected. The ideal system is called photon noise limited, and most of the noise we see in our digital camera images is just that: noise from the light signal itself.
To improve the noise, the only solution is to collect more light, either by a larger aperture, or longer exposure time, or both. Light collection from an object in the scene is proportional to the aperture area times exposure time, and the noise will be proportional to the square root of the product of aperture area times exposure time.
Sensors also show random noise from reading the signal from the sensor, called read noise. After the sensor, the camera electronics can also contribute random noise, and the combined sensor read noise plus downstream electronics noise is sometimes called apparent read noise.
Calibration and the Astro Work Flow. The astro workflow is designed to solve several problems with sensors. One myth is that the calibration eliminates noise. It does not! It reduces pattern noise, but increases random noise!
Fixed-Pattern noise is sometimes called banding but also includes other patterns. Fixed-pattern noise can appear as line to line changes in level (banding), and lower frequency fixed-patterns that can include things that look like clouds, ramps and other slowly varying structures across the image. Fixed patterns repeat from image to image.
Pseudo-Fixed-Pattern noise. Fixed-pattern noise can appear in one image, but is different from image to image, or changes after a few images. For example, banding may change from frame to frame.
Pattern noise that appears random. Pattern noise can appear random in a single image, but repeats from image to image.
Sensor Read Noise is random noise but can also include fixed-pattern noise. Read noise does not change with ISO (gain) nor temperature, however, some sensors have dual gain in the pixel design, and the read noise will appear different depending on that gain state (ISO). Sensor read noise does not change with temperature. Most often, read noise values are combined with downstream electronics noise which does change with ISO.
Downstream electronics noise is noise from electronics after the sensor. As ISO increases, the downstream electronics noise relative to the amplified signal is lower. Downstream electronics noise does not change with temperature.
Dark Current noise is both random and can include fixed patterns (and possibly pseudo-fixed patterns). Noise from dark current is the square root of the dark current, and dark current changes with temperature, typically doubling every 5 to 6 degrees Centigrade increase in temperature. Smaller pixels tend to have lower dark current.
Non-uniformity fixed pattern noise is variations in the response (sensitivity) of each pixel. Also called Pixel Response Non-Uniformity, PRNU.
NEWER DSLRs and Mirrorless cameras have little to no Fixed-Pattern noise, low Pseudo-Fixed-Pattern noise, low Pattern noise that appears random, low Sensor Read Noise, low Downstream electronics noise, low Dark Current noise, and low Non-uniformity fixed pattern noise!
I often see online people recommending to those just starting out in astrophotography to buy old cheap cameras. Some web sites recommend old cheap DSLRs saying there is no difference with newer cameras. Some also state in forums, they started with a DSLR (turns out is was an old one) then went to dedicated newer astro cameras and it was a world of difference. But technology has marched on, whether stock digital cameras or dedicated astro cameras. In fact, many astro cameras use the same sensors as in some model digital cameras. So how much the switch from an old DSLR to a newer dedicated astro camera results in better performance over DSLRs is comparing different eras of technology, and would need careful evaluation, and should be taken as all-encompassing truth.
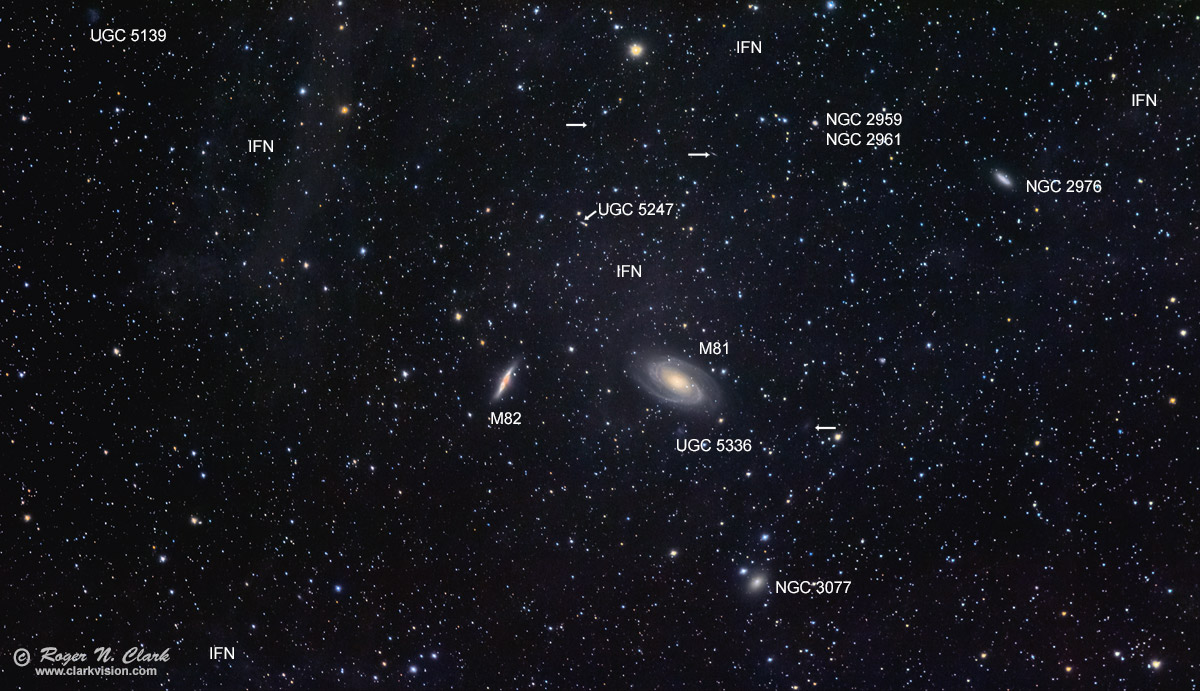
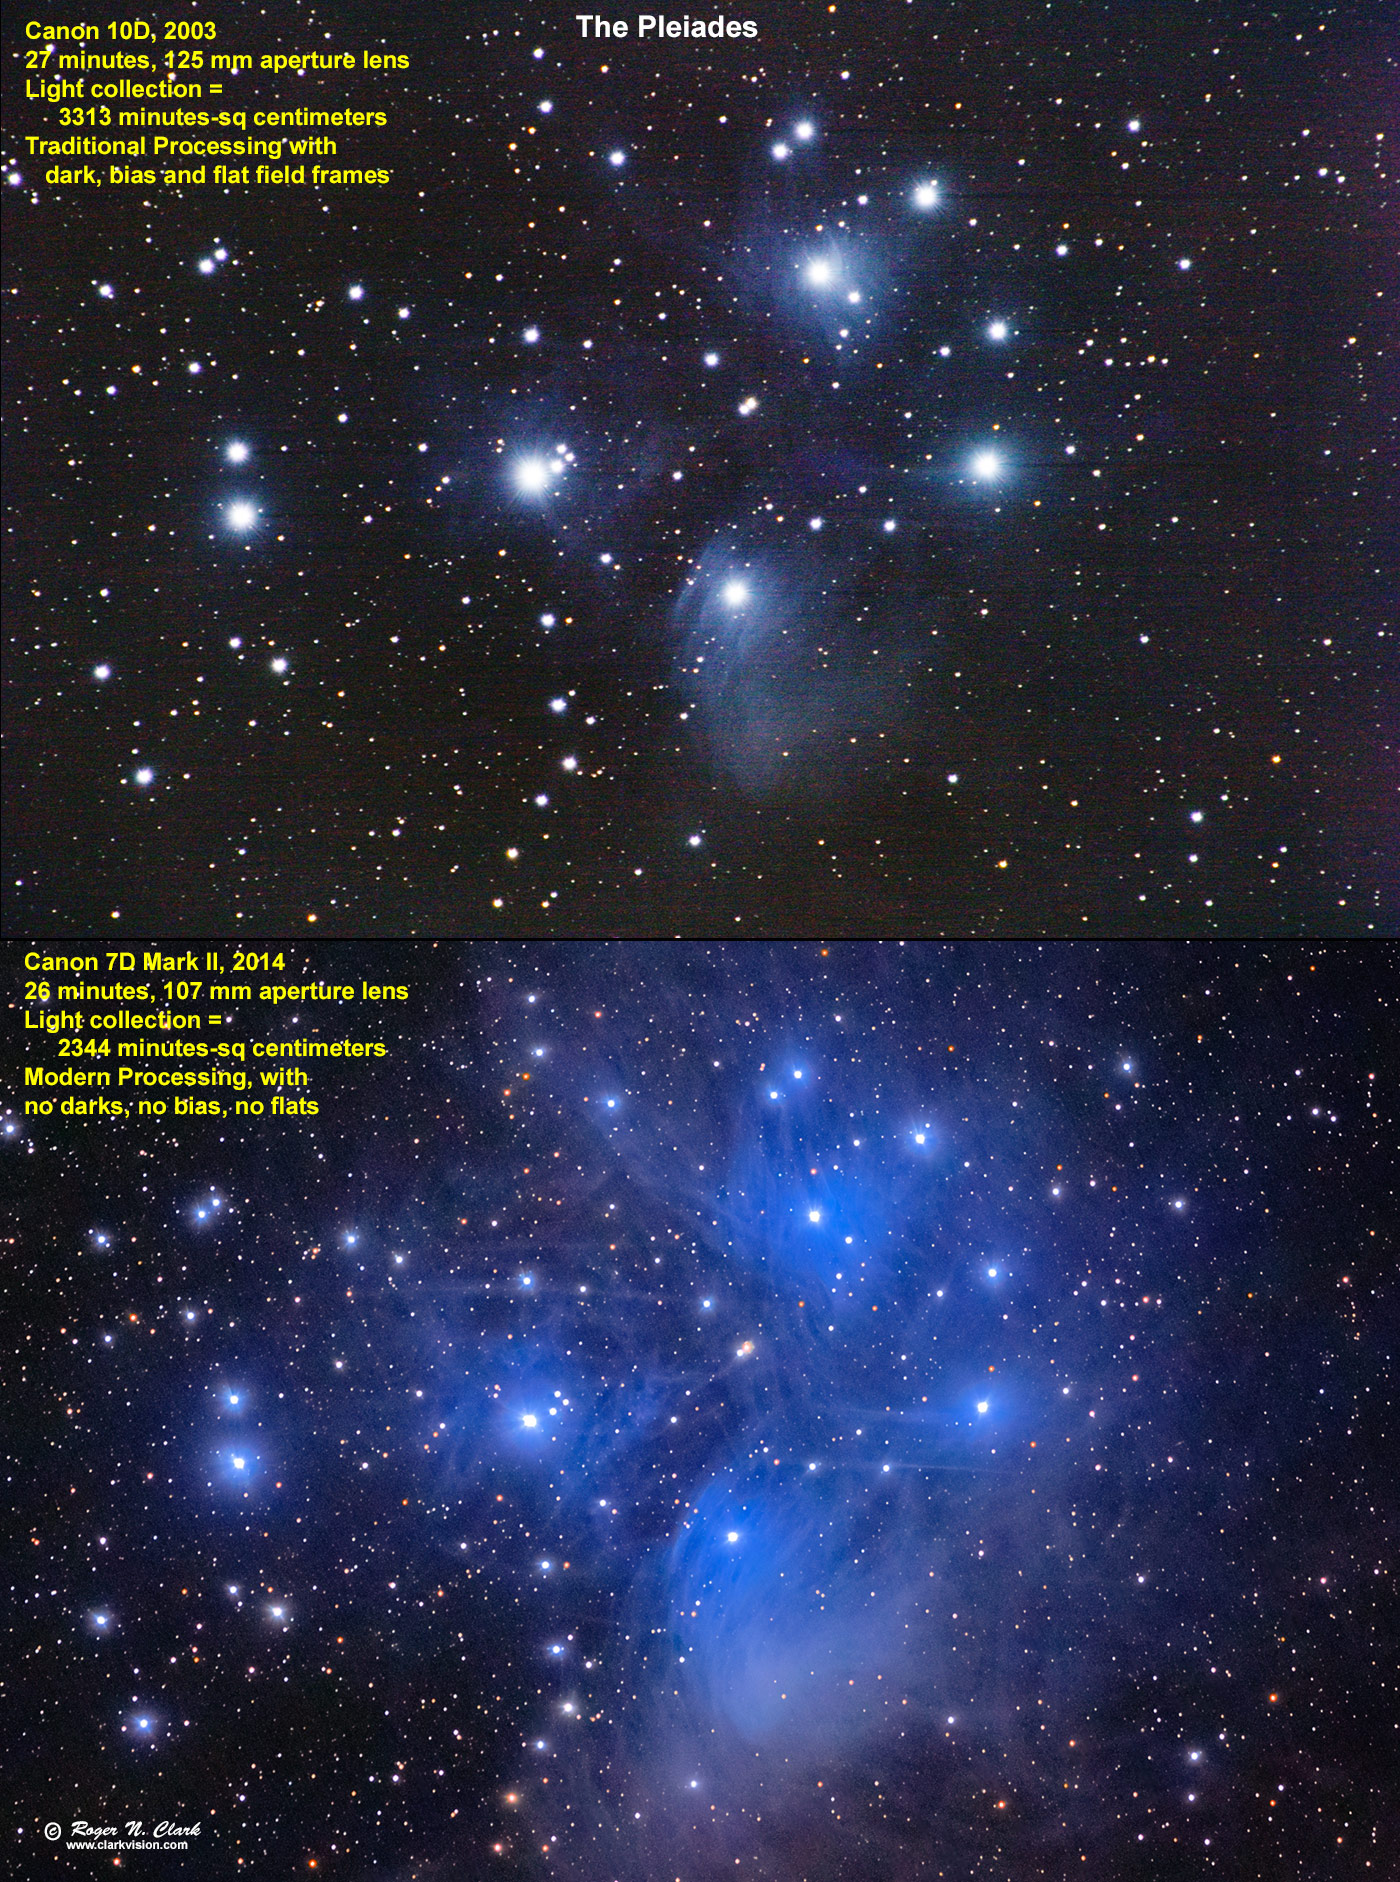
As stated throughout this article, there have been significant advancements in digital sensors used in stock digital cameras (as well as dedicated astro cameras). The advancement is illustrated in Figure 6, below.
The technical advancements from 2003 to 2014 in both sensor tech and in software algorithms (especially raw conversion algorithms) shows major improvements, allowing better images with simpler acquisition and post processing, The advancement is illustrated in Figure 6.
The technical advancements from 2003 to 2014 in both sensor tech and in software algorithms (especially raw conversion algorithms) shows major improvements, allowing better images with simpler acquisition and post processing.
Technical, Upper Panel, Figure 6. The image was made using a Canon 10D 6-megapixel digital camera, released in 2003, with a 125 mm aperture lens to acquire 27 one-minute exposures (27 minutes total exposure time), ISO 400. Darks: 25, flats: 10, bias: 10. The Canon 10D has 7.4 micron pixels, and 2.18 arc-seconds per pixel for the full resolution image.
Light collection per pixel = lens aperture area * exposure time * pixel angular solid angle.
Canon 10D light collection = (pi/4) * (12.5^2) * 27 * (2.18^2) = 15747 minutes-cm2-arc-seconds2.
Technical, Lower Panel, Figure 6. The image was made using a Canon 7D Mark II 20 megapixel digital camera and 107 mm aperture lens to acquire 26 one-minute exposures at ISO 1600 (26 minutes total exposure). No dark frame subtraction, no flat fields, no bias frames measured or used. Tracking with an astrotrac. The Canon 7D2 has 4.09 micron pixels, 2.81 arc-seconds per pixel for the full resolution image.
Canon 7D2 light collection = (pi/4) * (10.7^2) * 26 * (2.81^2) = 18460 minutes-cm2-arc-seconds2.
The lower frame, Canon 7D2 image, had 18460 / 15747 = 1.17, or 17% more light per pixel, thus a square root (1.17) = 8% advantage in signal-to-noise ratio. However, it is obvious the the Canon 7D2 image is far better than the 10D image. There is about a 7 to 8 times improvement in the Canon 7D2 signal-to-noise (S/N) ratio on the Merope nebula, and more for the fainter nebulae. To achieve similar S/N as in the 7D2 image, the 10D would need at least 50 times longer exposure! But the longer exposure would have more noise from dark current, thus much longer than 50x would be required.
The images in Figure 6 demonstrate the clear advantage of newer cameras, and with the advancements in sensor technology, comes simpler post processing workflow.
To make astrophotography even simpler, one can simply use the out of camera jpegs. To illustrate how simple this is, see the image in Figure 7, which was produced from out-of-camera jpegs! The image was made by simply stacking out of camera jpegs then stretching! To be clear, I don't advocate using jpegs for astrophotography, I only show this to illustrate how well calibrated an out-of-camera jpeg is. How is this possible? Jpeg is 8-bit and raw is typically 14-bit, so there is loss, but the loss is mainly at the high end. The tone curve boosts the low end by a factor of about 40 relative to a 16-bit tiff. The difference between 8 and 14 bit raw data is 4 bits, or a factor of 16. Therefore, the scaling preserves most of the low end at moderate to high ISOs. The main loss is in the high end which gets compressed. See Digital Camera Raw versus Jpeg Conversion Losses for more information on jpeg losses. A single jpeg exposure in the series that produced the image in Figure 7 adequately digitized the low level noise, and the stacked output was saved as a 16-bit tiff, so the data had plenty of precision. For comparison, here is a single out-of-camera jpeg image with no processing except downsize for web. Note that this image looks far better than a raw file demosaiced to linear in an astro work flow. That is because it is very well calibrated.
Astrophotography can be much simpler than with the traditional methods taught on the internet. To be clear, these methods were necessary early on in the the digital sensor revolution from film. But it seems that the traditional astro workflow and the methods that were quickly embraced for the needed changes from film, got stuck in the 1990s while technology moved on. Some astrophotographers have recognized the dark current blocking technology in new sensors and a growing number are skipping measuring dark frames.
The digital camera manufacturers, engineers who design the sensors and cameras, and the software engineers who write professional processing software have made continual strides in improving both quality and simplicity to produce images from a digital camera, whether cell phone, DSLR, or mirrorless camera. And those improvements are continuing even over the last few years and I expect them to continue into the future.
The result ov all this new technology is that if you embrace it, astrophotography can be made much simpler, and with the color calibrated workflow, produce better colors, more consistent color, lower noise, and better detail than if the same data were put through the traditional workflow from the 1990s and before.
There is a misconception in the amateur astrophotography community that if you don't measure calibrations frames (darks, flats, bias), your images will not be calibrated and will have higher noise. The results shown here, and in Sensor Calibration and Color shows that not only is this not the case, but that the traditional workflow is the method with incomplete calibration! To be clear, the traditional method can include the missing calibration steps, but this is largely ignored by online tutorials, and even in guides from the amateur software suppliers.
There are also misconceptions in the amateur astrophotography community that one must have a modified digital camera or dedicated astro camera if one is to photography hydrogen emission nebulae. This misconception is largely due to the color destructive methods in the traditional workflow as commonly taught, including background neutralization and histogram equalization. This is further described in the Sensor Calibration and Color article.
All the images in my astrophoto gallery from the last dozen+ years have been made with the modern simpler workflow described here and made with stock digital cameras and stock camera lenses, and relatively short total exposure times. This is possible due to the advancements in sensor tech and post processing software, especially the color calibration of modern raw converters used for regular photography. Most images in the gallery also used low periodic error trackers with no autoguiding. Thus, the images were made with simpler data acquisition and post processing, relative to traditional methods.
The method described in this article applies to RGB color imaging in benign environments. If you change to narrow band imaging with a dedicated sensor, the traditional workflow is needed. Also if you operate in an extremely hot environment, hotter than around 30 C (86 degrees F) at night, a cooled astro camera may be a better way to go (but evaluate the latest tech as noise from dark current continues to improve with new sensor generations).
NASA APOD: Dark Dust and Colorful Clouds near Antares This is the best image of this area that I have ever seen.
NASA APOD: Spiral Meteor through the Heart Nebula
NASA APOD: Eclipsed Moon in the Morning
M45 - Pleiades and surrounding dust from very dark skies
The Sadr Region of the Milky Way with a cheap barn door tracker I made
M31 - Andromeda Galaxy [20mins exposure]
Veil Nebula from bortle 2 skies with unmodded DSLR
The Witch Head nebula looking at Rigel
The Pleiades (M45) - The Seven Sisters
If you have an interesting astro image processed using my modern methods, please let me know and I'll consider including a link here.
References and Further Reading
Clarkvision.com Astrophoto Gallery.
Clarkvision.com Nightscapes Gallery.
Goossens, B., H. Luong, J. Aelterman, A. Pizurica and W. Philips, 2015, An Overview of State-of-the-Art Denoising and Demosaicing Techniques: Toward a Unified Framework for Handling Artifacts During Image Reconstruction, 2015 International Image Sensor Workshop. Goossens.pdf.
The Night Photography Series:
| Home | Galleries | Articles | Reviews | Best Gear | Science | New | About | Contact |
http://www.clarkvision.com/articles/astrophotography-made-simple/
First Published March 24, 2023
Last updated April 10, 2023