
ETHICS in Night Photography
Landscape Astrophotography, Nightscapes, Deep Sky Astrophotography
by Roger N. Clark
Night photography is becoming more and more popular and that is leading to
problems between photographers. This article discusses some of those problems
and recommends solutions to minimize conflicts.
The Night Photography Series:
Contents
Introduction
Photography Ethics
Problems in the Field
Light Painting
Bright Flashlights
Lighting Solutions
Destroying the Landscape
Post Processing
Anything Goes, But Disclose
Cloning, Removing or Adding Elements, Composites of Different Scenes
Mosaics, Panoramas
Color, Contrast and Intent
Most images of the Milky Way online are FAKED COLOR
Conclusions
References and Further Reading
All images, text and data on this site are copyrighted.
They may not be used except by written permission from Roger N. Clark.
All rights reserved.
If you find the information on this site useful,
please support Clarkvision and make a donation (link below).
Introduction
There are many forms of night photography, and not all are compatible.
Nightscapes refers to landscape photography at night, usually including
stars or other interesting subjects only visible at night and integrating
the land and sky into the recorded scene. Light from stars in the night
sky is very faint and to record those stars relatively quickly before the
Earth's rotation blurs the stars into a trail places important constraints
on the imaging system. The landscape is usually darker, requiring 2 to 6
times more exposure to get a decent exposure. Because of this dichotomy,
some people use lights to light the landscape. That causes problems for
photographers who want to use only natural light. Some photographers
use white or red lights to examine their gear, often too bright and they
sometimes shine their lights onto other photographers.
The difficulty in obtaining images of the night sky and the landscape at
night is difficult enough, but processing the images is often even more
difficult. This has led some photographers to construct images that are
impossible, e.g. by cloning things in or out of an image, or combining
scenes made in different directions or places. Failure to disclose such
actions can lead to charges of faking it and loss of reputation.
Some people are teaching night sky image processing methods that produce
fake colors. While photographers have artistic license to produce any
composite and colors they wish, and call it art, shouldn't one disclose
such methods, especially if teaching? Those teaching should ethically
disclose to their students when their processing methods are producing
fake scenes, including fake colors. Unfortunately, such disclosures
are rare, leading other photographers to believe those fake colors
are real. Fake blue Milky Way images are so common these days that few
realize the color they have been taught is fake and far from natural.
Even documentary films are now using night sky scenes with fake colors.
This trend started circa 2008 by some professional photographers that
did not understand the unique situation of night sky imaging and used
the wrong math to reduce light pollution in images.
Photography Ethics
Would you as a photographer purposely set up in front of another photographer
taking a picture of a sunset landscape? Would you purposely run around in a daytime scene where
a photographer was taking a picture with the intent of ruining their image?
Would you shake bushes and tree limbs to ruin someone's picture? Would you
shine lights into someones camera at night to ruin their exposure?
I think, and hope, the answer by most reasonable people would be no.
And that has been mostly my experience with daytime photographers with only
a couple of exceptions in the last several decades.
But night photography is different. One can not always tell if a photographer
is nearby imaging all or part of your scene. Suppose that what you were doing impacted
the other photographer? If you knew that would you stop? Would you share the
time and negotiate with the other photographer? Again, I would hope most
photographers would be courteous. That does not seem to be the case with night
photographers, especially with their lights. I have had night photographers walk
in front of me and set up their tripods in front of me. And I have constant problems
with photographers and their lighting the landscape at night.
My encounters with night photographers and their lights have not been good. In not one case
when I have asked a photographer to stop using lights have they stopped. This article is about
the ethics of night photography and impacts on other photographers. I'll start with lights
and add other issues as they come to my attention.
Would you teach a class and purposely mislead people by telling them things that
are not true? I would hope not, but such teaching is not only common in the world
of night landscape photography post processing, but to find truth is the exception.
Problems in the Field
Light Painting
The image in Figure 1 was not the image I had hoped to get on the night of
May2/3, 2019. A group of night photographers were at the base of Balanced
Rock, Arches National Park, Utah, shining lights on the rock and ignoring
what other photographers might want to image. The lights might have been
fine if it was for a short time, but they did this for hours (Figures
2a, 2b). It forced other photographers to adapt and image what they
were imaging without consideration that someone else might want to do
something different. It was not possible to see the landscape in its natural
environment, nor photograph the natural light at night.
I was 1/4 mile away (0.42 km) from Balanced Rock and not in a position to
speak to the photographers at the base of the Rock. I only went into the
park after speaking with rangers earlier in the day and they assured my
no light painting was allowed. Later, I heard the photographers at the
base of Balanced Rock had a permit, though I never saw it. I checked
again the next day with park rangers and they assured me again that
no light painting was allowed and they did not know of any permits.
Whether or not they had actual valid permits I never found out, but even
so, do they have an ethical right to dominate the entire critical part
of the night when the Milky Way rose behind Balanced Rock?
If one is light painting at night, exposure times on the landscape should
be reduced. If one is imaging with only natural light, exposure times
are longer. Light on the land is lower than the sky, typically requiring
exposure 2 to 6 times longer for the same amount of light collection.
If one is using lights, needed exposure times are shorter. So ethically
it should be simple to turn off lights for periods of time so other photographers
have a chance at getting their own images of the natural environment.
Besides impacting visitors and other photographers at night, lights also impact
wildlife. For example, see:
Animals Need the Dark (National Park Service) nps.gov, and
Artificial Night Lighting and Protected LandsEcological Effects and
Management Approaches(Revised August 2017), pdf, nps.gov.
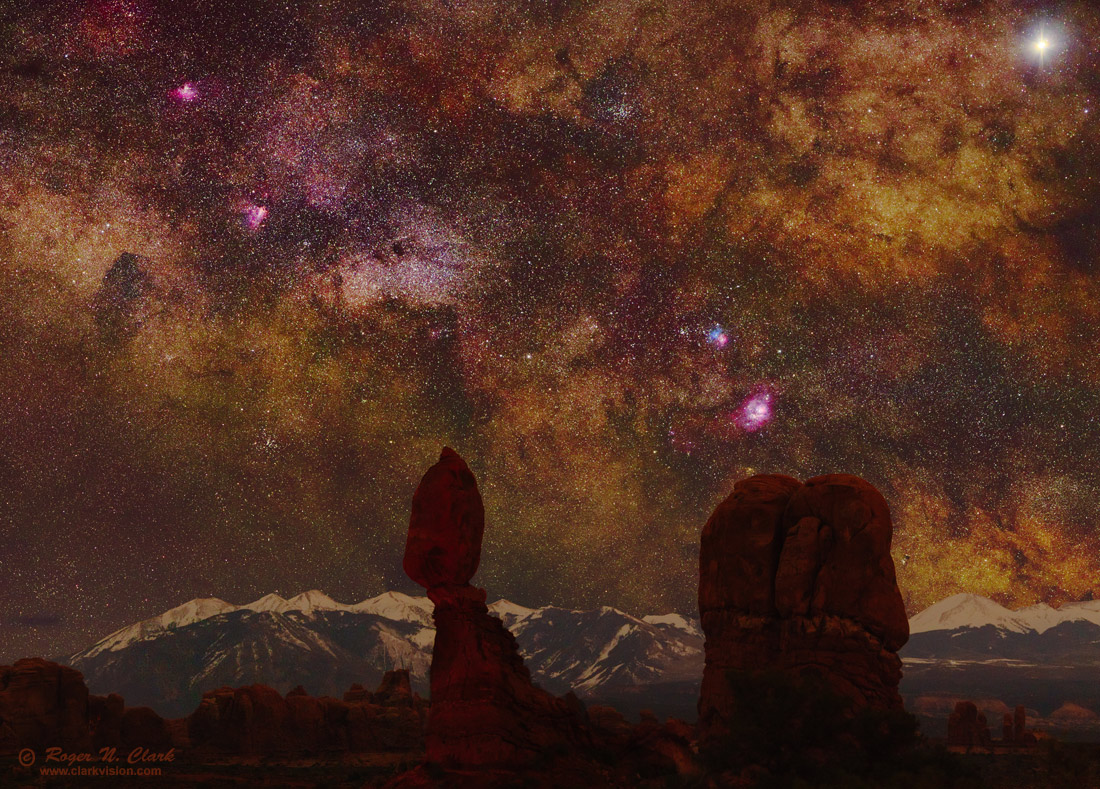
Figure 1. An example nightscape image in natural color. This is
not the image I was hoping to get with my 105 mm f/1.4 lens. I wanted to
make a larger mosaic with a foreground that includes components closer to me
to make a vertical panorama. I waited and waited for the photographers
to finish with their lights. At 1:30 am after the Milky Way had moved
beyond Balanced Rock, I moved on, knowing I could not get the image I
wanted due to thoughtless photographers. It took me hours of work to
try and minimize the problems of uneven light due to the photographers
lights, and I never got parts of the image I had intended.
Larger Gallery Image and more information about this image.
The images in Figure 2a and 2b illustrate uneven artificial light on the
landscape from photographer's lights. At the time of the images, the brightest part of the Milky
Way and very bright Jupiter (the bright object near the to right in the
frame) would have put more light on the right side of Balanced Rock.
Thus, the artificial light looks particularly unnatural, i.e. fake,
being on the left side. I didn't want fake light in my image.
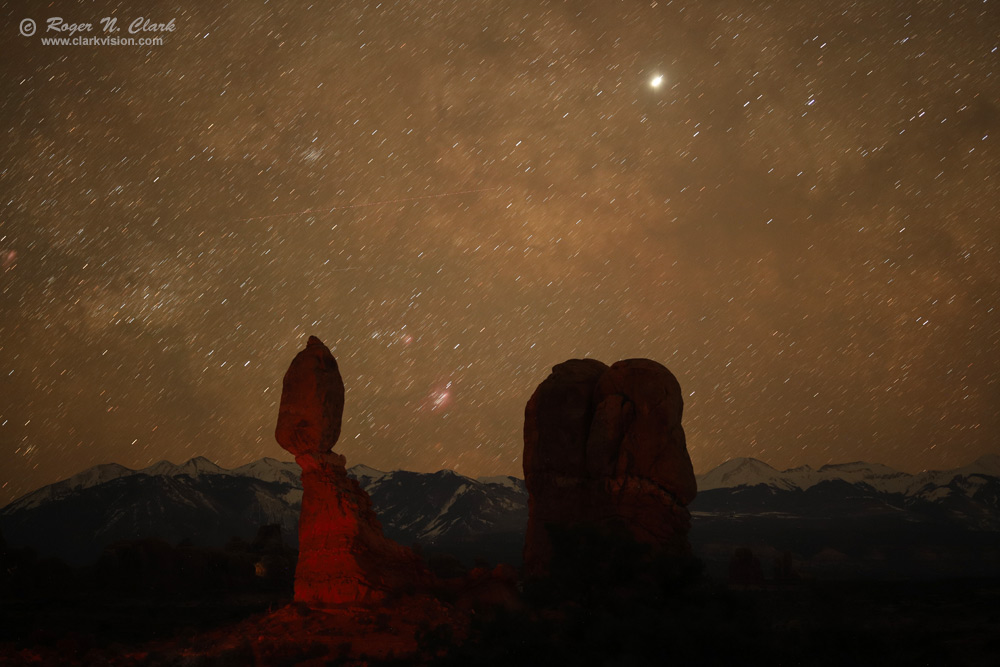
Figure 2a. The effect of light painting Balanced Rock, Arches National
Park. Note the uneven lighting: one side of Balanced Rock is bright,
the other dark, and the large rock to the right is dark. Rocks in the
background are dark. The view is unnatural.
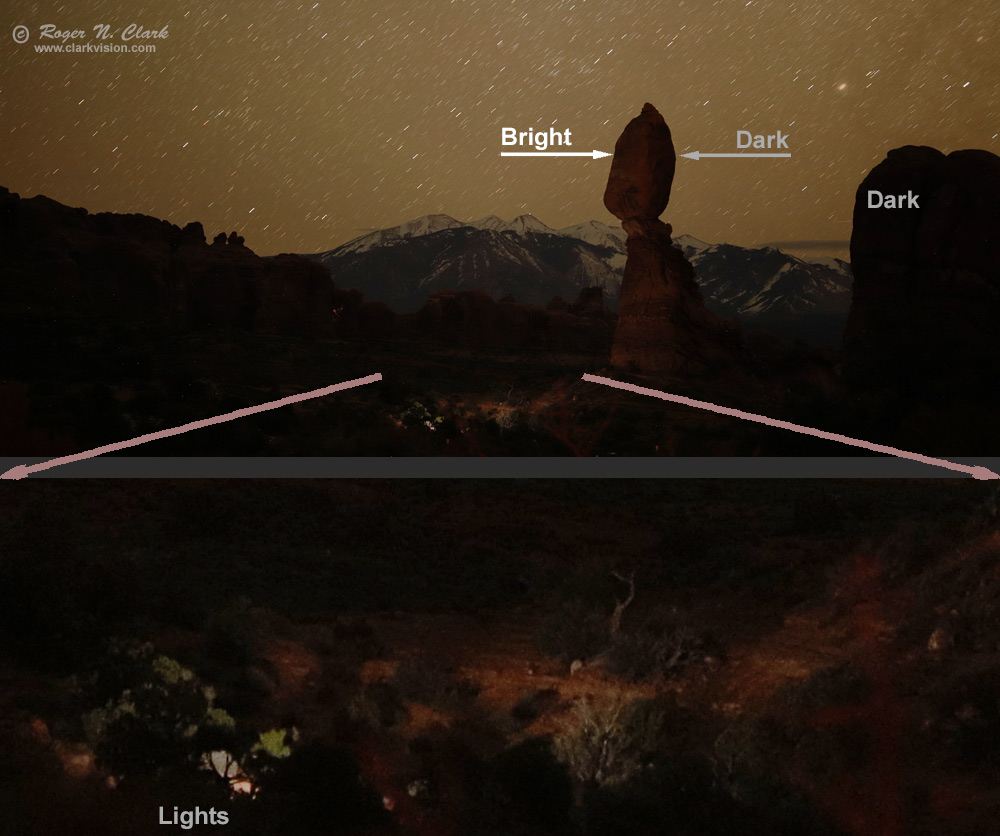
Figure 2b. The effect of "low level" light painting on Balanced Rock,
Arches National Park. Again we have uneven lighting: one side of
Balanced Rock is bright, the other dark, just at a lower level, and the
large rock to the right is dark (upper panel). Rocks in the background
are dark. But the source of the low-level light shines more brightly on
the foreground (lower panel). The overall effect is obvious artificial
light that is uneven and detrimental to photographers trying to capture
a larger view of the natural environment.
Another time in Arches National Park, I was about 2 miles (3.2 km) west
of the North and South Windows, Turret Arch and Balanced Rock, hoping to
do an image of the Milky Way rising over these structures (Figure 3).
But the constant light painting from Balanced Rock to Turret Arch by
numerous photographers meant I had no chance. I waited a while, but
the light painting continued until the Milky Way was too high for the
composition I wanted. Of course these photographers did not know I was
2 miles away trying to make an image. But do they need to dominate
the night with lights for several hours, preventing anyone else from
making images?
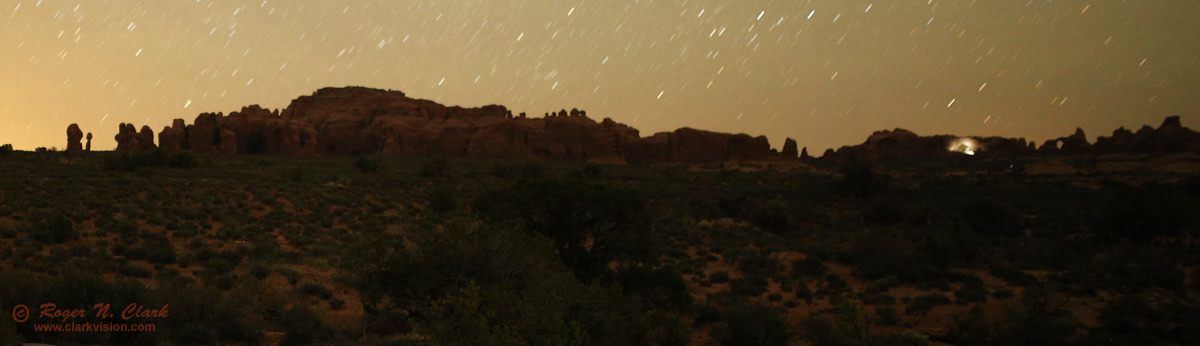
Figure 3. Light painting by a photographer in the Windows region
of Arches National Park ruins a nightscape of the Milky Way rising.
I could not make my intended image that night due to the light painters.
I went to the Maroon Bells, Colorado for a fall nightscape. The timing
of the New Moon, peak fall colors, and alignment of the Milky Way only
happens every few years. I arrived in twilight and planned an
evening image before the Milky Way got too low. Unfortunately there
was a guy there bragging about his two 2-million candle power lights he
was illuminating the landscape with. Figure 4b shows an image of the
same trees in my scene and lit by his lights. I had to wait until he was
done--there was no compromise. The Milky Way had sunk somewhat lower than my
intended image after he was done so I could start my imaging. Why should
I have to wait? Was that fair? I would leave no trace and not impact
the scene like this guy did with his lights. I can only imaging what
the impact on animals was in the valley with bright lights shining all
over the valley for a long time. You might ask, that because I was making
a mosaic, why couldn't I do the sky first while he did the landscape
with his lights? I could not because his lights were so powerful, they
scattered off the atmosphere adding light pollution to this remote valley
were there was no light pollution.
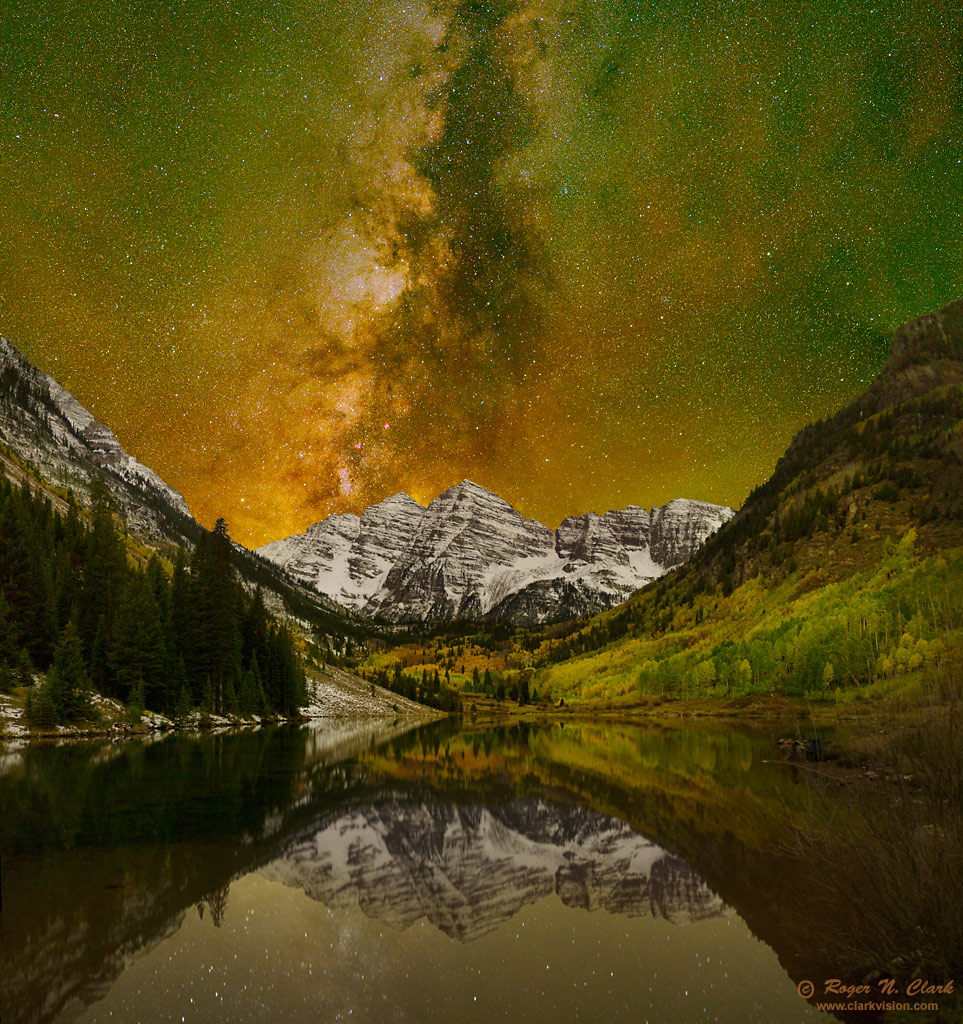
Figure 4a. This Maroon Bells Nightscape was possible only after a guy with
two 2-million candle power lights completed his image. By that time, the
Milky Way had set lower than I wanted and I did not get the image I wanted.
The green and red sky is from airglow. This is a natural color image with all natural
light.
Larger Gallery Image and more information about this image.
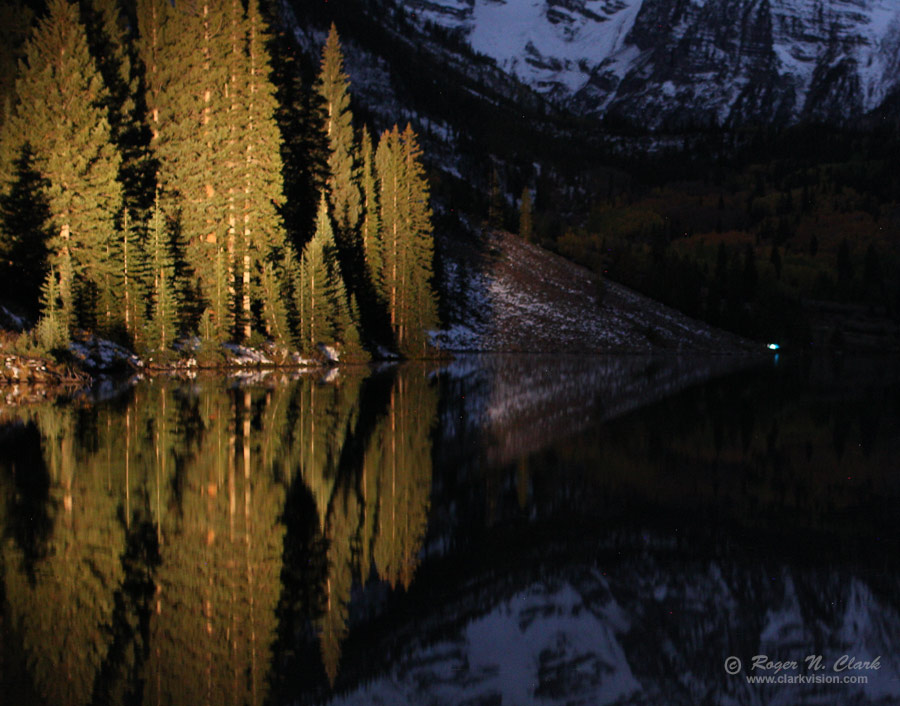
Figure 4b. Example frame where a guy lit the trees with a 2-million
candle power light, preventing me from making a natural light image.
The lights were shining all over the valley.
The trees in this image are seen in Figure 4a on the left.
Personally, I find light painting like this to make horrible images.
Bright Flashlights
Photographers nearby using flashlights that are too bright can be a significant
problem. Figure 5 illustrates the impact on an image of the sky
by someone using a bright red flashlight out of the frame. Impacts
to the foreground landscape are even greater.
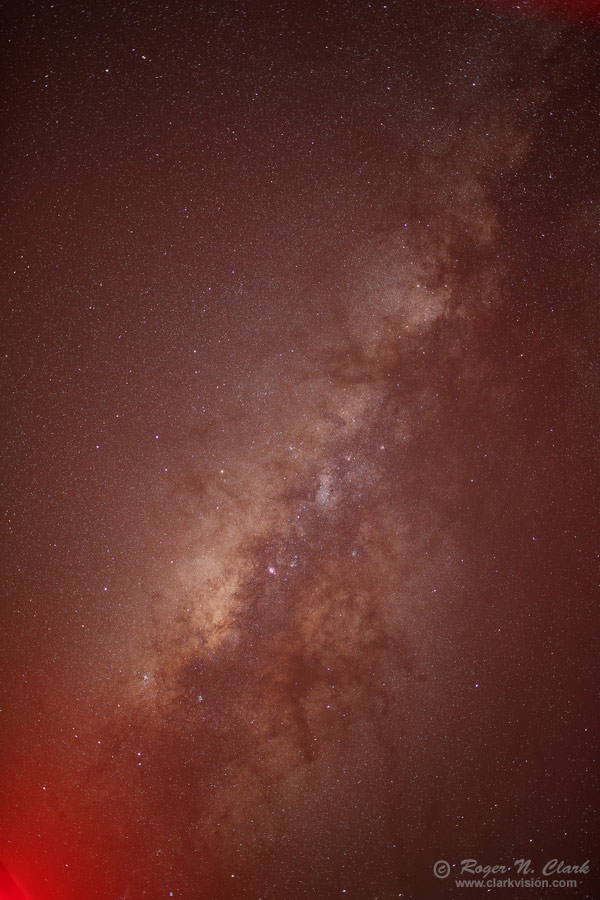
Figure 5. A 30 second image made with a full frame camera and 35 mm f/1.4
lens was ruined by another photographer using a bright red flashlight.
The flashlight was out of the frame, but so much light scattered off
the atmosphere that the impact was significant. The entire scene has
turned reddish with bright red in the lower left corner. This is from
an out-of-camera jpeg image with no adjustments, just resize for web.
Lighting Solutions
Solutions with light painting are simple.
- Assume there are other photographers you can't see and that any
light you turn on will negatively impact them.
- Minimize the use of lights. Turn them off for periods.
- Lights off time should be longer than on time, for example, lights on for 5 minutes,
lights off for 25 minutes.
- Keep a regular schedule, such as lights on at the top of the hour for 5 minutes,
then again at 30 minutes past the hour for 5 minutes. If you can't get
your exposure with lit objects in 5 minutes, maybe you don't know what you
are doing and need to do some research. The images in Figures 2a and 2b
were only 30 seconds at ISO 1600, f/1.4, so even f/2.8 would be only 2 minutes,
or 4 minutes at f/4.
- Better: learn to make images that only use available light and add
no artificial light to the scene.
Solutions for using lights around your camera:
- Use multiple flashlights with differing intensities.
- Dim yellow-reddish. Use brown paper or brown plastic, or tape
over the front of the flashlight to make
it dimmer. Test it in a dark room and make it just barely bright
enough to use close up to your camera to see what you need to see.
See
Lighting and Protecting Your Night Vision for more information
and how to check light levels.
Low power white light LED flashlight (add absorbing paper/tape to make dimmer):
- Slightly brighter yellow-to-red flashlight, used for finding
something you dropped or need to see something at a longer
distance.
Low power white light LED flashlight (add absorbing paper/tape to make dimmer):
- Brighter red flashlight: use only for emergencies, and warn people
that you need to turn it on. If it can wait a few moments,
ask other photographers to let you know when their exposures
are complete before you turn on the bright light. Red works by
supplying enough light to see some distance, and allows one to
recover dark adaption faster. However, note that strongly-colored
light warps color perception for a many minutes.
Red light LED flashlights:
- Bright white flashlight: use only for emergencies, and warn
people that you need to turn it on. If it can wait a few moments,
ask other photographers to let you know when heir exposures are
complete before you turn on the bright light.
Bright white light LED flashlights:
- Use glow in the dark tape to see things like tripod legs and reduce the use of flashlights.
Glow in the dark tape:
- Put black tape over lights not needed, like LED lights on a camera that turn
on during the exposure.
Destroying the Landscape
It should be obvious that one should not destroy the landscape in an
effort to make a photo, or to prevent future photographers from getting
similar images from that site. Photographers have been known to saw
off limbs of trees after they have taken a picture so no one else can
get that image (though it was probably photographed tens of thousands of
times by previous photographers), or trample flowers so no one else can
"get the shot." You can google and find many examples.
It is also important for photographers to not inadvertently impact the
landscape to get an image. For example, trampling vegetation to get to a
spot to take a picture. In arid regions, walking off trail can destroy
cryptobiotic soil. This is particularly important in the Moab, Utah
region and the Colorado Plateau. Cryptobiotic soils are found all over
the world and the tiny filaments of biota making up such soils help keep
the fragile ecosystem from eroding from wind or water. Do not trample on
cryptobiotic soils or other vegetation just to get to a spot for a photo.
This is particularly important at night when these things are difficult
to see. One footstep into cryptobiotic soil can take decades for the
soil to recover.
Post Processing
Anything Goes, But Disclose
Photography is art, and most amateur astrophotographers just want to
make pretty pictures. In that regard anything goes, even total fakery,
as long as the photographer is honest as to what was done.
Some people believe only a single image made in camera is real, and even
a mosaic or contrast stretch is faking it. Then another thought is
no photo is real--it is always fake, even out of camera. There is no
clean answer or line to cross.
While technically no photo is perfectly accurate, viewers have an
expectation that a photo has some resemblance to reality. Modern cameras
do pretty well in this regard. For example, a snapshot of a person in
reasonable light by almost any digital camera, even a smartphone camera,
will produce skin tones that are reasonable representations of the person.
It doesn't take exotic color science to be able to produce reasonably
accurate color images: green vegetation looks green, flesh tones look
similar to the live view, blue sky is blue (though perhaps not a perfect
sky blue, still somewhat close), and all this out of camera with no
processing.
While modern cameras can make quite impressive images representing
reality, photographers do all kinds of post processing that changes
things, perhaps far from reality. This is done under "artistic license"
but sometimes is done to deceive. Reputations are lost when one tries
to do something that deceives others, so it is best to describe what
you did to make a photo, including post processing steps, in order to
avoid loss of reputation.
Cloning, Removing or Adding Elements, Composites of Different Scenes
Faking an image by cloning parts in or out of a scene is generally looked
on as the worst form of faking an image. To be clear, removing a dust
spot, fixing a hot or dead pixel in an image is not removing something
from the scene--it is fixing a defect in the camera. There are also small
things that some people might not object to. For example, few would cry foul if you
cloned out a small piece of trash in the scene that you hadn't noticed, especially
in the dark. But if you cloned out power lines for a great photo, and someone
visited the scene to find such power lines, they would not be happy, and could
start an online campaign saying you are not honest. So best to declare any
cloning of major components into or out of the scene.
An example of cloning occurred around the time I wrote the first part of this article.
National Geographic published in April 2019 an article titled
See the world's oldest trees by starlight, then after multiple people pointed out
the images were faked, National Geographic had to pull the article.
See
This Milky Way Photo on Nat Geo is Raising Eyebrows, petapixel.com for some
info on what was cloned. Then people diagnosed fakery in other images:
Scientific Errors in Those Nat Geo Milky Way Photos, petapixel.com. Then people
looked at other images from the photographer and found more fakery:
I can't stop finding repeats in the work from this one photographer, twitter.com.
The lesson from the above posts is that if you fake something, people will
likely figure it out and your reputation will be trash. However, if you
disclose what you did, people can take it for what it is, constructed art.
Composites of different scenes are another issue. For example, one of
the above tree at night faked images was a baobab tree in Namibia in
the southern hemisphere but the stars were from the northern hemisphere.
It was an impossible scene. I have seen other night photographers use
an image from one direction, say a nice northern landscape composited
with an image of the night sky facing south. Again, people will see
this as a fake unless you disclose.
Any scene that is a composite or cloned components that another
photographer can not make from the same location and time of year should
be disclosed as to what you did. Certainly you can say this is just
my opinion, and that is true. But not disclosing and being honest puts
your reputation at risk from others.
Mosaics, Panoramas
Many night photographers are making mosaics and panoramas (stitching).
Night sky photography is one of the most difficult forms of photography
and the light levels are extremely low. With the available technology
people have to work with, the limitations mean some challenges to record
enough light. While it would be nice to be able to go out and make a
snapshot and get the sky and landscape recorded with enough exposure
to produce a nice image, that is not the case with today's technology.
And it will never be possible because of the physics of light, even with a
100% efficiency sensor and perfect optics. Long exposures are required
to collect enough light to make an image. For example, some of my images
received less than one photon per pixel per minute on faint nebulae,
requiring many minutes of exposure to collect even a few dozen photons.
For landscape astrophotos while the Earth rotates, one can not collect
enough light from land and sky in a short enough time to make great images
before the sky rotates. Thus, people make separate exposures, tracking
the sky and fixed position for the land, then combine these into a photo.
Some people like to take only one image of the land and sky and just
take whatever light they can get. Both are fine, but again it is best
to disclose. And you can see such disclosures in my
Nightscapes Gallery.
Panoramas are another form of mosaicking (stitching), often to get a
wider field of view, like more than 180 degrees of the horizon to show
the Milky Way arching in the sky. This too is accepted photography and
again is best if you disclose what was done.
Color, Contrast and Intent
First some definitions about color.
True Color. Color and contrast as close as possible to the human
visual system. The wavelengths recorded match that of the human eye.
Natural Color. What most film and digital camera daytime images
are--color spectral response that is close to the human eye response,
but may be different in contrast and saturation. The 3 colors can also
be converted to black and white in various proportions to change contrast.
The wavelengths recorded reasonably match that of the human eye.
Enhanced Color. "Extreme" or strong pushing of contrast and/or
saturation. There is a continuum between natural color and enhanced
color. A daytime landscape image is typically natural color that has
been enhanced some. A portrait of a person is typically less enhanced.
Fujichrome Velvia film might be considered enhanced color.
False Color. Includes color outside of the visual passband. For
example False-color IR photography includes near infrared. Mid-infrared
or ultraviolet imaging are also false color. It can also be black and
white (e.g. image one wavelength outside the visual range). Most Hubble
Telescope images and most images from professional observatories are
False Color or Narrow Band Color. Most of my professional scientific
work is false color and narrow band (most commonly narrow bands in
the infrared).
Narrow Band Color. Use of narrow passbands to isolate particular
properties, typically for imaging a specific composition. Narrow band
can be entirely inside the visual range, outside the range, or both.
Narrow band can also be black and white (e.g. an image at one wavelength).
All the above are legitimate imaging options. True color is the
hardest to achieve, and is not actually possible with current technology with
some unusual spectral content. It probably comes closest in portrait
photography as people generally want accurate skin tones.
All forms of the above can make beautiful and stunning images.
There is one additional color scheme I'll define:
Variable Color Balance/Mangled Color. This is color balance that
changes with scene intensity or a color balance so shifted that visible
colors are radically shifted, like red to blue. And often we see extreme
color balance combined with variable color balance with scene intensity.
This is different than enhanced color, which may just boost saturation
and contrast (e.g.bluer blues, redder reds). Variable color balance
is common in Milky Way photography on the internet today.
Contrast.
Depending on conditions, we can perceive different contrast in a scene.
For example, on a sunny day, the contrast is generally high. On a
foggy day, contrast at the same location, contrast is generally low. At night,
contrast in the night sky is variable depending on the level of light
pollution, haze, and airglow (molecules emitting light high in the
atmosphere having been excited by cosmic rays and from solar UV in the
daytime). This haziness is collectively called skyglow. Sometimes the
photographer's intent may be to remove some or all of this haziness,
increasing contrast. Figure 2a, above, shows the skyglow from an out
of camera jpeg (contrast is also lower due to the smearing of details
from the long exposure). Compare that image to the finished image in
Figure 1. Most of the skyglow has been subtracted and fainter nebulae
and stars in the night sky boosted in brightness showing more detail
and contrast. Such a view might be possible on a night with no light
pollution, no haze, and extremely low airglow. The view would be even
higher in contrast if the Earth had no atmosphere.
Most daytime landscapes have had some adjustments of contrast and it
is generally accepted in photography that contrast is changed from the
original scene for artistic reasons. In film days, the choice of film
meant different contrast, and printing on different papers with different
filters meant different contrasts. Photographers rarely disclose
changes in contrast. You will see on this web site descriptions
of processing methods which include changing contrast.
Intent. In night sky photography, one must choose intent. From
the Earth's surface, we are looking through a murky, absorbing and
glowing atmosphere, with added light pollution. Is the intent to
include atmospheric effects or not? Generally, for deep sky, the usual
feeling is to remove at least some atmospheric effects (e.g. subtract
light pollution and airglow) so the view is like that beyond Earth (for
any of the above color schemes). If a nightscape, often the intent is
to show the airglow but subtract some/most light pollution. It could
also be close to a straight out of camera image with no modifications
(subtraction of light pollution or airglow). Or one could produce an
image like what we see with our eyes (desaturate fainter things, but
keep color in brighter things). This is all accepted fair game and need
not be disclosed in detail. Again the processing tutorials on this
site will give some indication of the range of possibilities.
My preference for stock DSLR photography is:
Nightscapes: natural color (some enhancement) with airglow, but subtract
at least some or most light pollution.
Deep Sky astro: Natural color, usually corrected for atmospheric
absorption, sometimes with enhancements. Solar type stars come out
white/yellow-white, similar to our Sun.
But enhancements are relative and confusing. As the amateur astronomy
community evolved into the digital age, practices in processing often
left images pretty desaturated (e.g. see the default output of deep sky
stacker). Then people stretched images, losing more saturation. then
they applied saturation trying to get color back. A perception emerged
that things in the night sky are relatively colorless. Further, those
using Bayer color digital cameras and applying astro processing tools,
didn't include color matrix corrections, making their images desaturated,
furthering the misperception that colors in the night sky are pastel.
Now that we have color preserving stretches and wider understanding
of color matrix corrections, we see colors in the night sky are really
quite impressive (not like the grey default output of deep sky stacker).
Now the challenge is to educate the amateur astronomy world that colors
in the night sky are impressive.
For more on colors in the night sky, see the series starting here:
2a2) The Color of the Night Sky.
Most images of the Milky Way online are FAKED COLOR
The Milky Way IS NOT BLUE in natural color.
If you do a google search for how to make night sky images, you will likely
come across many sites teaching how to make images like those in Figure 6 middle and right
panels. Photographers
teaching these bad methods have done so for so long and produced so many
blue images they do not want to acknowledge that their images are producing blue
artifacts and unnatural color and even become hostile in discussions about color.
Further, such teachings have become so common that many people think the natural
color of the dark, moonless night sky, including the Milky Way is naturally blue.
Indeed, the problem has become so pervasive since circa 2008 when this fake blue
processing method became popular, and even documentaries are now using fake blue
Milky Way images. For example, see the BBC Planet Earth II, or Netflix Our Planet.
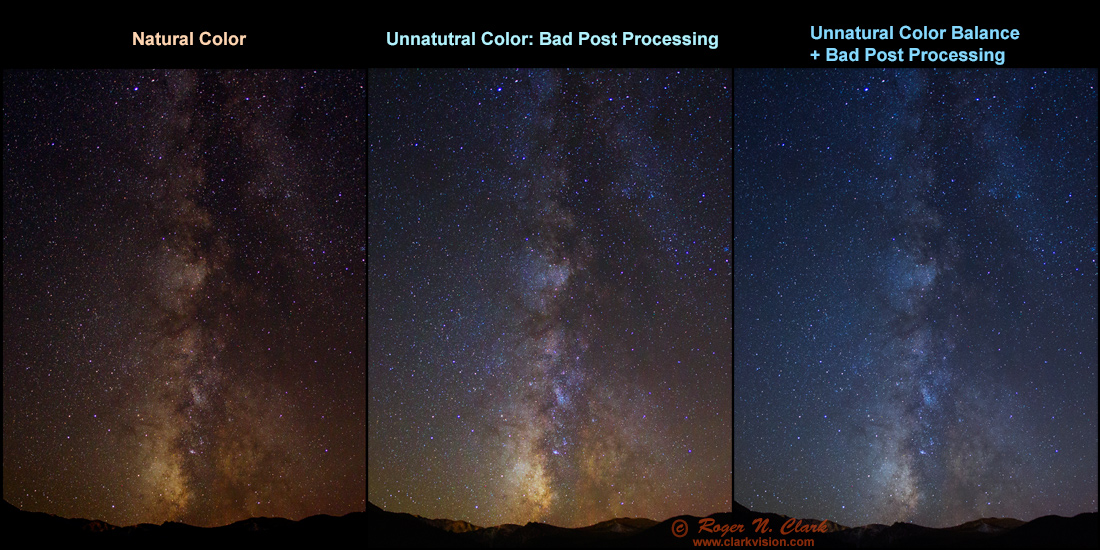
Figure 6. Different post processing methods leads to different colors.
The left panel shows natural colors verified by star photometry. The
middle panel shows color balance shifting with scene intensity causing
an unnatural bluing as scene intensity decreases. The right panel used
a tungsten white balance which made the image very blue to start, then
methodology like that in the middle panel to further shift faint parts
of the image even bluer. The middle and right panes are unnatural colors.
The images in the 3 panels were made from the same raw file, a 30 second exposure
made with an f/2.8 lens in moderate light pollution.
Photographers are certainly allowed to color their images any way they want for effect, even when
it is not natural. But those teaching this fake blue form of the night sky have an ethical
obligation to inform their students that the colors produced by their methodology is not natural.
I have no problem if those teaching sites would simply
acknowledge they are producing such colors for a particular effect
(e.g. mood) and acknowledge what natural colors exist in the night sky.
But too many are insisting their images are natural. Further, some
even insist the colors in images like I produce, which are verified
by color photometry and spectral intensities, are the ones that are not natural.
If you come across such sites, I recommend you steer clear.
Again, it is fine for photographers to color their images any way they wish
for mood. But if the site does not discuss that the colors they produce
are simply for a mood and not natural color, the authors may not know
what they are doing and actually believe they are producing natural color.
Indeed, I encounter many sites like this. If you see such sites, please
email the author and tell them. Be aware you might get a hostile response.
For more on natural colors in the night sky, see the series starting here:
2a2) The Color of the Night Sky.
For more on good versus bad post processing that produces fake colors, see
2d)
Verifying Natural Color in Night Sky Images and Understanding Good Versus
Bad Post Processing
Conclusions
The use of lights by photographers at night is currently a growing
problem. Use of lights to illuminate the landscape (e.g. light painting)
prevents other photographers trying to make images different from
the light painter. The impact can be for miles around, even when
using so-called low level lighting. Show consideration for other
photographers and use lights only for limited time. Even if you see no
other photographers, assume someone might be somewhere imaging the scene.
Use a common schedule, 5 minutes with light, 25 minutes with no lights,
with the time on at the top of the hour and 30 minutes past the hour.
For example, 10:00 to 10:05 pm lights on, 10:05 to 10:30 pm lights off,
10:30 to 10:35 lights on, 10:35 to 11:00 pm. lights off.
Use multiple flashlights in the field, using the dimmest possible light
for the task at hand. Bright red flashlights are very detrimental to
both other photographers and the red light they shine on the landscape and
into the sky. Such flashlights are only surpassed by bright white light
flashlights. Strongly colored lights, like red, warp color perception.
If another photographer asks you to turn off lights, do so.
My recommendations.
1) Use dim yellow to orange/brown light and minimize the impact of
artificial light on your night vision and color perception. That will
also minimize light impact on nearby photographers. When you do this,
you will see the wonder of the night sky. Certainly use a brighter
light as needed for safety, but warn other photographers when you want
to turn on bright lights.
2) Use minimal light for light painting and limit the time you light
paint. With the added light, your exposure times should be shorter
than those recording only natural light, so your time using the lights
should be significantly less than the time lights are off. I recommend
no longer than 5 minutes on and 25 minutes lights off.
3) Turn down the brightness of your camera LCD screens. That will help preserve
your night vision and reduce impact to other photographers.
4) Try only natural light. The image impact can be large (e.g. Figure 1).
Too often light painting looks artificial and unnatural. I have actually
yet to see light painting that looked natural.
Note that in my
Nightscapes Gallery you will see images with lighting.
For example, see
Bandon Oregon Nightscape
where the light was from the town of Bandon. I did not
add any light. Another example is
The Milky Way Galaxy Over the Serengeti where the light on the
landscape was from the lodge I was staying at. I did not add any light.
So certainly take advantage of existing light, even if artificial,
but minimize any impact you may have on other photographers.
In post processing, DISCLOSE any serious modifications to an
image, such as cloning significant parts of an image, or producing
unnatural color. By disclosing what you did and why in post processing
you promote your art without being charged as a fraud who fakes images.
If you find the information on this site useful,
please support Clarkvision and make a donation (link below).
References and Further Reading
Also see my:
Clarkvision.com Nightscapes Gallery.
The Night Photography Series:
http://www.clarkvision.com/articles/ethics-in-night-photography/
First Published May 10, 2019
Last updated May 16, 2019