ClarkVision.com
| Home | Galleries | Articles | Reviews | Best Gear | Science | New | About | Contact |
| Home | Galleries | Articles | Reviews | Best Gear | Science | New | About | Contact |
Contents
Introduction
Copyright and License
Davinci
rnc-color-stretch download
rnc-color-stretch on Linux, Unix
rnc-color-stretch on Mac OSX
rnc-color-stretch on Windows
rnc-color-stretch on Windows GUI
Back to Astrophotography Software
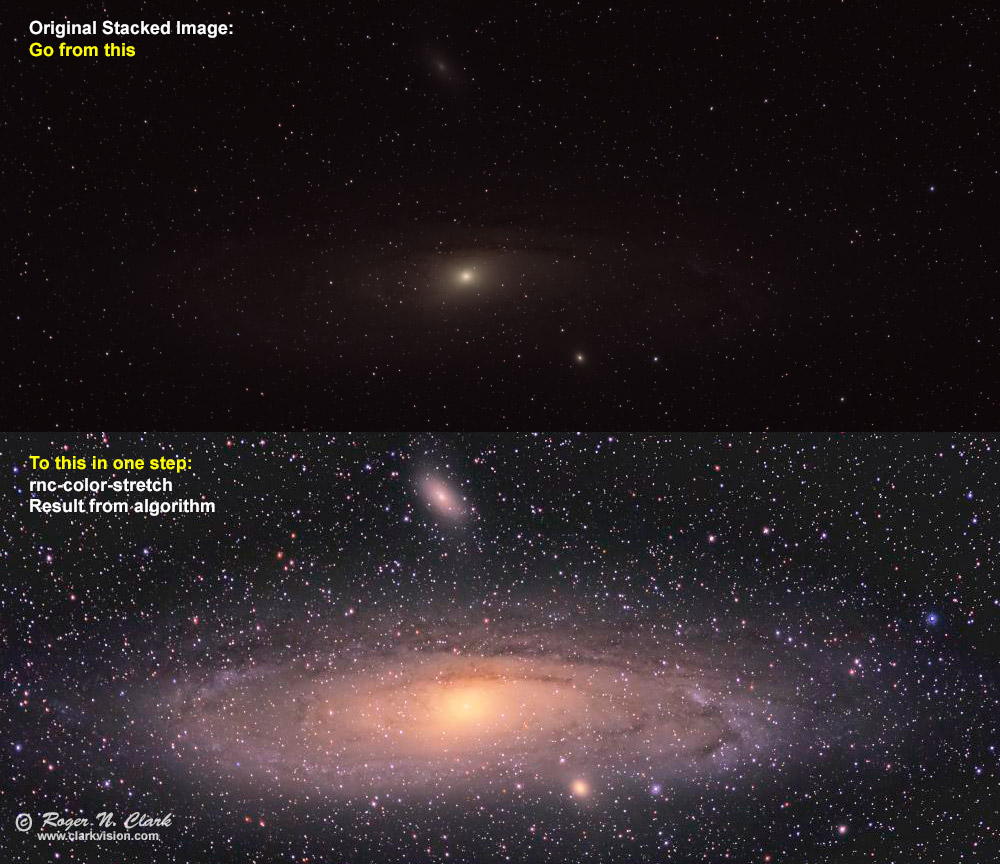
The rnc-color-stretch program provides advanced image stretching of astrophotography images able to extract faint signals from astrophotos while maintaining original color. The program enables novice to expert image processors with a consistent environment that fits well into a color managed workflow to produce spectacular natural color images as well as custom white balance or narrow band or UV-IR false color images. The rnc-color-stretch program is an open source davinci script.
NOTE: rnc-color-stretch does not (yet) handle skyglow gradients. If your image has gradients due to light pollution or airglow, that must be subtracted by another program first.
For optimal results with natural colors, use daylight white balance, modern raw converters,
and follow my basic work flow:
3a1) Nightscape and Astrophotography Image Processing Basic Work Flow.
How to use the program is described in the following articles:
Programs written by Roger N. Clark fall under the following license:
Copyright (c) 2016, Roger N. Clark, clarkvision.com
http://clarkvision.com/articles/astrophotography.software/rnc-color-stretch/
All rights reserved.
GNU General Public License https://www.gnu.org/licenses/gpl.html
Redistribution and use in source and binary forms, with or without modification, are permitted provided that the following conditions are met:
THIS SOFTWARE IS PROVIDED BY THE COPYRIGHT HOLDER AND CONTRIBUTORS "AS IS" AND ANY EXPRESS OR IMPLIED WARRANTIES, INCLUDING, BUT NOT LIMITED TO, THE IMPLIED WARRANTIES OF MERCHANTABILITY AND FITNESS FOR A PARTICULAR PURPOSE ARE DISCLAIMED. IN NO EVENT SHALL THE COPYRIGHT HOLDER OR CONTRIBUTORS BE LIABLE FOR ANY DIRECT, INDIRECT, INCIDENTAL, SPECIAL, EXEMPLARY, OR CONSEQUENTIAL DAMAGES (INCLUDING, BUT NOT LIMITED TO, PROCUREMENT OF SUBSTITUTE GOODS OR SERVICES; LOSS OF USE, DATA, OR PROFITS; OR BUSINESS INTERRUPTION) HOWEVER CAUSED AND ON ANY THEORY OF LIABILITY, WHETHER IN CONTRACT, STRICT LIABILITY, OR TORT (INCLUDING NEGLIGENCE OR OTHERWISE) ARISING IN ANY WAY OUT OF THE USE OF THIS SOFTWARE, EVEN IF ADVISED OF THE POSSIBILITY OF SUCH DAMAGE.
Davinci is an open source data manipulation program available from Arizona State U. http://davinci.asu.edu/ It runs on unix, linux, windows.
First install davinci to you local computer. Follow the installation instructions on the davinci web site. The only version of davinci for windows is a 32-bit application so can not handle images larger than about 34 megabytes in the stretch program. If you need larger, davinci must be run on a mac or in a linux virtual machine.
Download the rnc-color-stretch program here, then follow the operating system specific instructions below. The rnc-color-stretch file is ascii text which you may read to confirm it will not harm your computer.
Newest version
Latest version (version 1.02, 2023-06-29), has additional checks and better diagnostic messages when problems are found. There is also a new feature for restricting the histogram area to a small portion of the image. This will be documented in another web page.
Linux, Mac, and Windows download:
rnc-color-stretch-v1.02 (2023-06-29)
If windows has difficulty with the above, try:
rnc-color-stretch-v1.02-win (2023-06-29)
OLDER Versions:
Linux and Windows download: rnc-color-stretch-v0.975 (2017-11-26)
Mac OSX download: rnc-color-stretch-v0.975-mac (2017-11-26)
Version (version 0.97, 2017-11-09), reduces the memory used. On linux and macs there are no limits on image size (64-bit application). On windows with davinci 32-bit application, the memory limit is encountered somewhere near 34 megapixels.
Linux and Windows download: rnc-color-stretch-v0.97 (2017-11-09)
Mac OSX download: rnc-color-stretch-v0.97-mac (2017-11-09)
Version 0.96, 2017-07-01, adds more support for floating point ranges and more info if the range is unusual. Versions 0.96 and earlier on windows with davinci 32-bit would run out of memory between on images between 20 and 24 megapixels. There was no such limit on linux or macs.
Linux and Windows download: rnc-color-stretch-v0.96 (2017-07-01)
Mac OSX download: rnc-color-stretch-v0.96-mac (2017-07-01)
Linux and Windows download: rnc-color-stretch-v0.95 (2017-05-03)
Mac OSX download: rnc-color-stretch-v0.95-mac (2017-05-03)
Latest version (version 0.94, 2017-03-29, adds support for reading 16-bit signed integer files):
Linux and Windows download: rnc-color-stretch-v0.94 (2017-03-29)
Mac OSX download: rnc-color-stretch-v0.94-mac (2017-03-29)
0.938 (Dec 8, 2016): small fix for older versions of davinci reporting a simpler version of tif data format. Otherwise identical to version 0.936.
Linux and Windows download (OLDER): rnc-color-stretch-v0.938
Mac OSX download (OLDER): rnc-color-stretch-v0.938-mac
On linux or unix, copy the dounloaded rnc-color-stretch file to /usr/local/bin and change the protection to execute:
cp rnc-color-stretch-v1.02 /usr/local/bin/rnc-color-stretch
chmod 555 /usr/local/bin/rnc-color-stretch
Depending on how your linux install is set up, you may need administrator privilege to run the above two commands. You can do the above commands from a command line, or use a file browser.
Example: do the above copy command as administrator:
sudo cp rnc-color-stretch-v1.02 /usr/local/bin/rnc-color-stretch
sudo chmod 555 /usr/local/bin/rnc-color-stretch
Confirm your path to executable programs includes /usr/local/bin from a terminal window:
echo $path
or
echo $PATH
If /usr/local/bin is not in the path, you will need to add it (google for your
particular shell).
On some linux installations, davinci may be installed into /usr/bin instead of /usr/local/bin.
If so, add a 2-line script to /usr/local/bin/davinci with the contents:
#!/bin/sh
/usr/bin/davinci $*
Then change the permission to execute:
chmod 555 /usr/local/bin/davinci
Depending on which shell you are running, you may need to update the hash list
of commands you can execute. For example, with csh or tcsh, execute:
rehash
and the new command will be available for your use.
To use the program, use a terminal window to cd to the directory where your image is located
and run the command:
rnc-color-stretch yourimagefile.tif options
See the example use pages at the top of this article.
Install Issues on Some Linux Machines
From my linux pages, Linux for Photographers Part 3 I have the following which may help:
# davinci image processing:
# http://davinci.asu.edu/
# download davinci source code from above.
# To compile, you also need these packages:

apt-get -y install libpng12-dev
apt-get -y install libjbig-dev:amd64 libjbig0:amd64 libjbig0:i386libjbig2dec0 libjbig2dec0-dev
apt-get -y install jbig2dec jbigkit-bin
apt-get -y install libjpeg8-dev

# to compile some X11 programs

apt-get -y install libx11-dev

# note on compiling davinci 2.10 on linux mint 17:
# edit Makefile (after the ./configure)
# add to the line: LIBS = -lpng -lz -lm -lX11
# and make it:
# LIBS = -lpng -lz -lm -lX11 -ljbig
Try installing those packages. On my system, I have also have libhdf5-7, libcfits0, libccfits-dev, libcfits-dev, libcfitsio3-dev, libcfitsio3 installed. You might try installing those. If you compile from source code, you do a configure first and if fitsio is not there, it will skip those packages.
You might take a look at my linux install page: Linux for Photographers Part 3 You might find other useful programs for photographers there too. And if you know of one I should add, let me know.
Macs are similar to the linux install above as OSX is unix. On Macs copy the dounloaded rnc-color-stretch file to /usr/local/bin and change the protection to execute:
cp rnc-color-stretch-v1.02 /usr/local/bin/rnc-color-stretch
chmod 555 /usr/local/bin/rnc-color-stretch
You may need administrator privilege to run the above two commands. You can do the above commands from a command line, or use a file browser.
Example: do the above copy command as administrator:
sudo cp rnc-color-stretch-v1.02 /usr/local/bin/rnc-color-stretch
sudo chmod 555 /usr/local/bin/rnc-color-stretch
Be sure when you download davinci from ASU, you follow their instructions. Also install xquartz as instructed on the davinci download page.
On Macs, davinci gets installed in /Applications/davinci.app/Contents/Resources/bin
so you need to add
/Applications/davinci.app/Contents/Resources/bin to your PATH.
Confirm your path to executable programs includes
/usr/local/bin and /Applications/davinci.app/Contents/Resources/bin from a terminal window:
echo $path
or
echo $PATH
If /usr/local/bin and /Applications/davinci.app/Contents/Resources/bin are not in the path, you
will need to add it (google for your particular shell).
For bash shell, edit the file .bash_profile in your home directory (~/.bash_profile).
Append PATH=$PATH:/Applications/davinci.app/Contents/Resources/bin to the file.
save the file
Then on the command line, run:
echo $PATH
which gives something like:
/usr/local/bin:/usr/bin:/bin:/usr/sbin:/sbin:/opt/X11/bin:/Applications/davinci.app/Contents/Resources/bin
Depending on which shell you are running, you may need to update the hash list
of commands you can execute. For example, with csh or tcsh, execute:
rehash
and the new command will be available for your use.
Confirm davinci runs. From a terminal window, type:
davinci
and if you get the davinci prompt:
dv>
type:
exit()
to exit davinci.
Confirm the new programs will run. From you terminal window (command window) type:
rnc-color-stretch
and you should get information on running the program and a list of options.
To use the program, use a terminal window to cd to the directory where your image is located
and run the command:
rnc-color-stretch yourfile.tif options
See the example use pages at the top of this article.
Install Issues on Some Macs
On some macs it is not obvious (to me) how to get finder to see system directories like /usr/local/bin/, even after following some guides on the internet. On one mac, the path included /usr/local/bin/, but the directory did not exist. You can add this by hand. Open a terminal and run the following commands.
ls -l /usr/local/bin # lists the directory. Complains if it does not exist.
If it does not exist:
sudo mkdir /usr/local # sudo is administrator--you will need your password mkdir makes the directory.
sudo mkdir /usr/local/bin
The copy the script to /usr/local/bin:
sudo cp rnc-color-stretch-v1.02 /usr/local/bin/rnc-color-stretch
sudo chmod 555 /usr/local/bin/rnc-color-stretch
Now edit .bash_profile in your home directory (~ = home directory):
open -t ~/.bash_profile
and add at the end of the file the line:
PATH=$PATH:/Applications/davinci.app/Contents/Resources/bin
save and close the file.
Change directory to your image (command = cd). For example,
cd /disk1/photos/m31
pwd # print working directory
The tab key will help complete directory and file names to save typing.
Once you have cd'd to your directory, simply run the command
rnc-color-stretch filename.tif with added options.
A special thanks to Vincent Duparc for writing the batch script below which enables rnc-color-stretch to run. Vincent is also writing a gui which should be available shortly.
Download into the same directory where you downloaded rnc-color-stretch,
one of the following text files.
If you installed davinci in the default location, download
LaunchConsole.txt. If you are like me and do not like installing
3rd-party software into the windows operating system directory
C:\Program Files (x86)
then you will need to modify the script. I installed
davinci into:
C:\usr\davinci\
and if you do the same, download LaunchConsole-usr.txt.
Rename the txt file LaunchConsole.txt to LaunchConsole.bat
or
LaunchConsole-usr.txt to LaunchConsole.bat
You can view the LaunchConsole.bat to see that it does no harm to your computer. It just sets some environment variables and opens a command window. I change the default command window size (right click on the top of the window and select edit preferences. I set the width to 100 or 120 characters and length to 120 characters depending on the size of the screen. I also find it useful to turn on quick edit mode so I can copy and paste easier. Google search can show you more info about the command window.
To run rnc-color-stretch, copy LaunchConsole.bat and rnc-color-stretch to the directory (folder) where your image is located and using windows explorer, double click on the LaunchConsole.bat file name.
A command window is opened and it shows you how to run the program:
davinci -f rnc-color-stretch filename.png [options]
NOTE: the windows 32-bit davinci program failed to read some tif files when a tag was not present. (I haven't yet tested the new 64-bit davinci.) If you encounter this problem, convert your 16-bit tif to a 16-bit png file and davinci should read it OK.
ASU released a new davinci for windows as of November 18, 2016, but then pulled it in early 2017. Check the ASU download site and download the latest version available (2.07 as of spring 2017) and install it. The 2.07 version works fine with two issues: 2-gigabyte limit (it is a 32-bit app), and davinci 2.07 fails to read some 16-bit tif files. Convert your 16-bit tiffs to 16-bit png files and davinci will read them just fine.
Thanks to Vincent Duparc we now have a very nice Windows graphical user interface (GUI) to rnc-color-stretch!. See the readme:
Download the following file, RNCColorStretchGUI*.bin, after reading the README.txt file above and rename RNCColorStretchGUI.bin to RNCColorStretchGUI.zip. It is probably also good to scan programs for viruses first. Then unzip the file and follow the instructions in the Readme. The README.txt in the zip file is the same one as the above link.
RNCColorStretchGUI-v0.3.bin (Dec 6, 2016 pm) This is the latest gui version, but check the rnc-color-stretch version at the top of the page and if a newer version of rnc-color-stretch is available above, download it and point the gui to the new rnc-color-stretch program.
RNCColorStretchGUI.bin (Dec 6, 2016 am) (slightly older version)
Vincent has also put the project on github: https://sourceforge.net/projects/rnccolorstretch-gui/
NOTE: the windows version of davinci has problems reading some tif files. For example, tiff commonly lacks a tag:
SAMPLEFORMAT tag missing; assumptions will be made in data format determination
The mac and linux versions continue just fine, but the windows version of davinci stops. If you encounter this problem, convert your image to png.
How to use rnc-color-stretch is described in the following articles:
Back to Astrophotography Software
| Home | Galleries | Articles | Reviews | Best Gear | Science | New | About | Contact |
URL: http://clarkvision.com/articles/astrophotography.software/rnc-color-stretch/
First Published November 30, 2016
Last updated June 29, 2023.