
Large Digital Mosaics as a Substitute for Large Format Film
by Roger N. Clark
Introduction
If you like to make large "knock your socks off" prints, the traditional
method of achieving the required image quality is to work with large
format film (4x5, 5x7, 8x10 inch film and larger). For example, a 4x5
sheet of film, drum scanned on a high-end scanner can produce 12,000 x
16,000 pixel images and larger, far higher than current digital cameras.
An alternative method to make large pixel count images is to mosaic many
smaller images together (either film or digital). But large format view
cameras have interesting advantages that ordinary digital cameras and
lenses do not have. The main advantages of a view camera are the tilts
and shifts of the film plane and the lens plane (Scheimpflug rule).
Tilts and shifts are used to change perspective and change the plane
of best focus to help obtain a greater depth of field. Can mosaics of
digital camera images do the same thing, and can they achieve the same
resolution needed to make large sharp prints? This articles discusses
some of these issues.
All images, text and data on this site are copyrighted.
They may not be used except by written permission from Roger N. Clark.
All rights reserved.
If you find the information on this site useful,
please support Clarkvision and make a donation (link below).
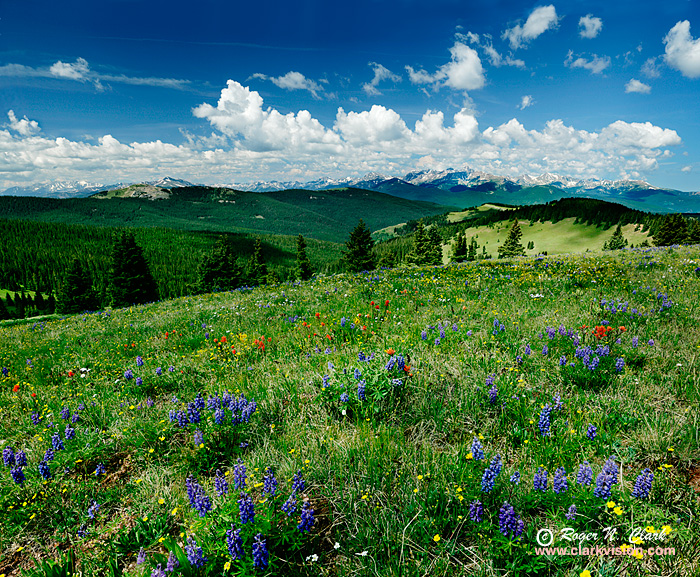
Figure 1. A 59-frame mosaic using 8.2-megapixel digital
camera. The full resolution image is 15,250 x 12,571 pixels.
The morning view is from Shrine Pass, Colorado and the tallest
mountain to the right of center is the Mount of the Holy Cross.
The image in Figure 1 shows an example of a digital mosaic that included
59 frames from a Canon 1D Mark II (8.2 megapixel) digital camera. The
lens used was a Canon 28-135 mm IS f/3.5-5.6 zoom lens working at
f/11 and 65mm focal length. The exposure
time on every frame (camera on manual) was
1/80th second at ISO 100 with a circular polarizer.
Only jpeg images were recorded. The
images were recorded in 4 rows using a custom panoramic tripod
head with the camera mounted so that the long axis of the frame was
vertical (portrait mode). The camera was used in autofocus
mode on the center sensor so the focal point of each image was
different and optimum for that frame. The idea with this strategy
is that a faster f/ratio could be used than that typically
used with large format cameras requiring a larger depth of field (from the
nearest point to the horizon). The horizontal field of view of the
final image is approximately 90 degrees, similar to about a 63 mm lens
on a 4x5 camera.
The images were assembled using PTGui. PTGui allowed for control and
compensation of lens distortion, and final image projection. Note the
horizon is flat, even though in this very wide angle image,
the horizon is not centered (wide angle images often
suffer from curved horizons unless the horizon is centered).
This image suffers from some tilting of the trees at the left and
right edges. PTGui allows for correction of this with a slightly
different projection (I am still experimenting and learning the
program). The output of PTGui was selected as a photoshop file
with both the final image and all the layers from each image.
Some post PTGui photoshop work was needed to change the areas
merged for best focus between the many frames. The photoshop
psb file was about 5.0 Gigabytes in size. The final 16-bit per pixel
photoshop file after the layers were flattened is 1.2 Gigabytes. The jpeg
acquisition format was a test to see image quality from such a simple
and lowest signal-to-noise ratio image set from the DSLR (the jpeg
quality was the highest the camera could produce). The exposure time was
set to not saturate the clouds and the land was underexposed. The land
portions of the image were selected and brightened. The curves tool
was used to give a characteristic curve similar to that of slide film.
To illustrate the detail in the final image, 100% crops, from the
areas indicated in Figure 2 are displayed in Figure 3. The
crops indicate that the image is very sharp in all portions of the
frame, both near and far.
How sharp is the final image compared to film? While a 4x5 film image
was not obtained at the same time as the mosaic, I have obtained
many 4x5 images on slide film. Figures 4 and 5 illustrate high-end
drum scans of Fujichrome Velvia 50 4x5 images. The Figure 4 scan
produced an image size of 16,200 x 12,800 pixels, similar to the
size of the digital mosaic shown here. The 4x5 image in Figure 4 was
taken with a 90 mm lens at f/64 with front tilts of the lens plane
to help the depth of field. The Figure 5 scan gave a 16,200 x 12,800
pixel image, and was obtained with a 185 mm lens at f/45. The film
grain is clearly apparent, and edges are soft in comparison to the
digital images in Figure 3.
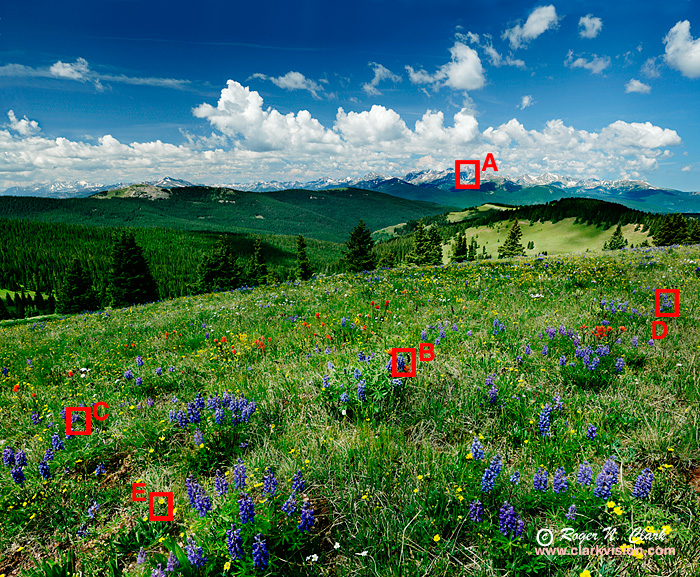
Figure 2. Areas shown in the red boxes have 100% crops shown
in Figure 3.
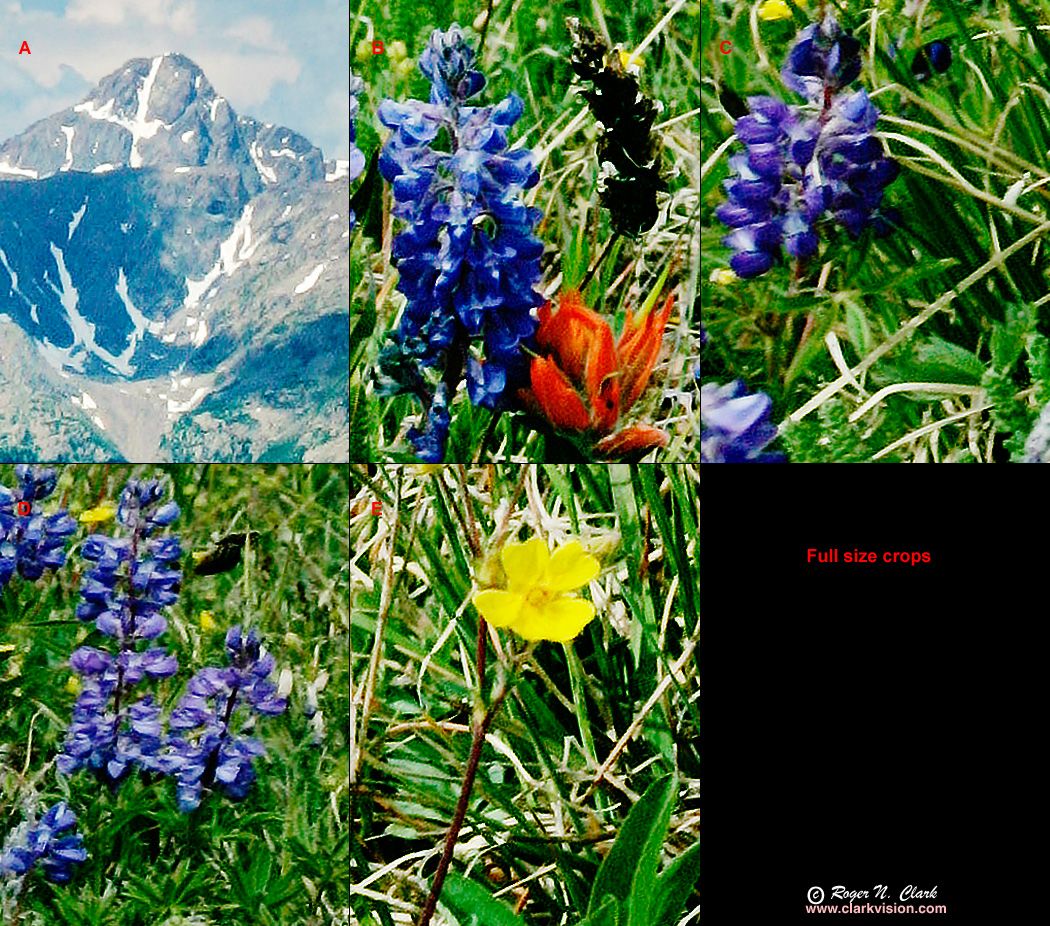
Figure 3. 100% crops from Figure 2. If these crops were printed at
300 ppi, the full image would be 50.8 x 41.9 inches.
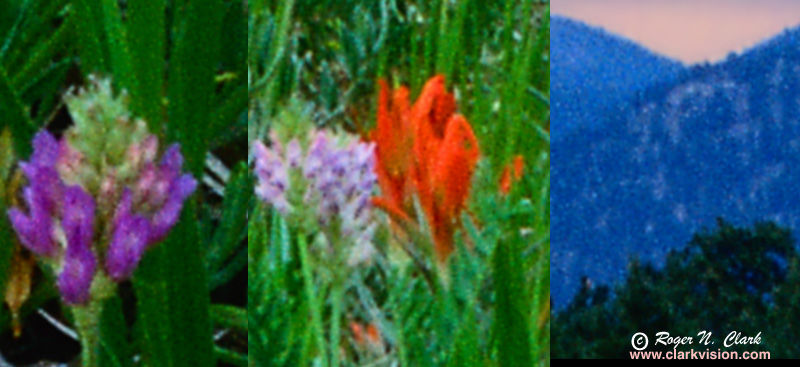
Figure 4. Example 100% crops from a large format film image scanned on a
drum scanner. The film was Fujichrome Velvia, scanned on a
Linotype-Hell, Heidelberg Tango scanner resulting in a 16,200 x 12,800
pixel image. If these crops were printed at
300 ppi, the full image would be 54 x 42.7 inches.
The full image can be seen by clicking on the title:
Wildflowers in the Maroon Bells - Snowmass Wilderness of Colorado.
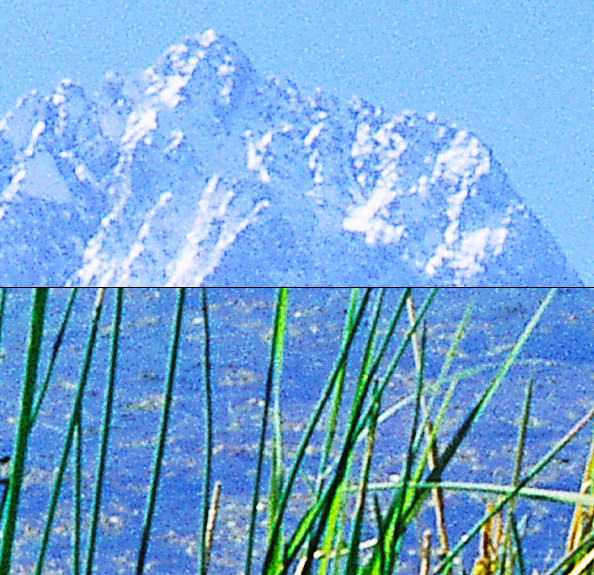
Figure 5. Another example of 100% crops from a large format film image scanned on a
drum scanner. The film was Fujichrome Velvia, scanned on a
Linotype-Hell, Heidelberg Tango scanner resulting in a 16,200 x 12,800
pixel image. The original full resolution image is 15,986 x 12,628
pixels. The image was obtained with a 185 mm lens at f/45.
If these crops were printed at 300 ppi, the full image
would be 53.3 x 40.1 inches.
The full image can be seen by clicking on the title:
Mount Sneffels Reflection.
Comparisons of the 100% crops from the film scans (Figures 4 and 5)
with those from the digital mosaic (Figure 3) show a dramatic difference
in sharpness. The differences include the fact that a faster f/ratio of
the digital resulted in less diffraction effects, and the film has a lower
Modulation Transfer Function (MTF) for recording the fine image
detail in these images.
Another factor in large format landscape photography is exposure
time. The use of a polarizer and slow f/ratios (typically
f/22 to f/64) requires long exposure times, typically 0.5 to 2 seconds
in full sunlight. The use of faster f/ratios allows faster
exposure times. In fact, at the time the digital mosaic in Figure
1 was obtained, wind was blowing the flowers and a large format
image at the required f/45 for this image
would have resulted in many blurry flowers. If I was carrying
my 4x5 equipment, I would not have attempted an image due to the
wind.
Pros to Digital Mosaics
- Weight. My digital equipment day pack weighs about 30 pounds.
In 2006, when I first wrote this article, that included the
1D Mark II camera, 28-135 mm lens, 185 mm L macro,
x 300 mm f/4 L IS lens, 1.4x TC,
Gitzo 1228 carbon fiber tripod with Arca-Swiss B1 ball head,
Wimberly Sidekick, and home-made brackets to make a pan-head,
spare battery, flash cards, lens cleaning equipment,
water, food, coat, and emergency kit. My 4x5 equipment weighed
about 40 pounds without the 1D mark II and telephoto lenses which
I use for wildlife. I was carrying 50 pounds and more to do
4x5 plus 1D Mark II with wildlife lenses. IN 2015 I was carrying a
Canon 6D similar lenses, but usually dropped the Sidekick and
custom brackets for the gimbal system for rotating about the nodal point.
Now I do a lot of work hand held!
- Image format flexibility. With digital mosaics, I can
choose the format I want for the image. With 4x5 one is stuck
with 4x5 proportions, or crop from there. With digital
I can choose a narrow and long panoramic (up to 360 degrees), or square,
or any proportion in between.
- Image sharpness. With digital mosaics, I can achieve better
sharpness than with 4x5 drum scanned film.
- Dynamic range. Digital has a much higher dynamic range than
film, especially color positive film.
- Signal-to-noise versus grain. Digital has higher signal to
noise and does not suffer from grain, unlike even the finest grained
slide films.
- Faster shutter speeds. Because each frame can be a small portion
Of the total scene, the f/ratio needed for the depth of field
is lower (wider aperture), thus shutter speeds are faster. This
has allowed me to make images in windy conditions where I would
never have gotten out the 4x5.
- No need to scan images. I find that tedious and still have
a backlog of many great 4x5 images to scan.
- Less time. I would often take 30 to 45 minutes to setup,
determine tilts and focus, then take 4 images (including bracketing)
with my 4x5 camera. With digital mosaics I can obtain the same image
in under 10 minutes (in 2006). In 2014-2015 with experience and hand held,
I make large mosaics hand held in seconds!
Here is an example image of a 15 frame mosaic made in 46 seconds on a beanbag with a telephoto lens, resulting
in a 107 megapixel image.
- With the much higher sensitivity of digital sensors, nightscape mosaics are now possible that
are impossible to make with film of any size. See
See my nightscapes gallery.
-
By letting the focus shift between frames, a faster aperture can be used,
moving the focus as one move from near to far mosaic frames. Then one
only needs to be concerned with the depth of field within one frame.
This reduces the slow aperture requirement typical in large format
photography. For example, one might use f/8 or f/16 in the digital
mosaic that would require f/32 or f/64 with largeformat. This enables
making images in windier conditions. Faster shutter speeds also mean
hand held high resolution images are possible, especially when using
image stabilized lenses.
Cons to Digital Mosaics
- Depth of field matching. Learning the requirements to keep the image
in adequate focus between images is a challenge until you have sufficient
experience. Circa 2006, To match the detail of 4x5 film, similar focal
lengths, and similar total image area were required because digital
sensors only have relatively large pixels and resolution per square
mm similar to that of film. But circa 2014 and beyond, the smaller
pixels common in digital cameras and improved sensitivity of those
smaller pixels means one achieve similar image quality with about 1/4
the area. the active area of 4x5 film is about 12,000 square mm, while
a 35 mm sensor is 864 sq. mm. The area ratio is a little less than 14.
Circa 2006, full frame digital cameras were rare, thus requiring 40 to 60
digital camera frames to match 4x5 (including overlap between frames).
Circa 2014 and beyond, with full frames digital cameras becoming more
common, higher megapixel counts and better sensitivity, 4x5 image quality
can be achieved with as little as 9 to 16 frames. Circa 2015+ with 50
megapixel cameras out, and using quality lenses, 4x5 quality might be
achieved with a few as 2 frames (2x2 mosaic). However, these smaller
numbers are only valid if depth of field is not and issue. For the need
of extreme depth of field images, more frames are needed, or tilt-shift
lenses. Experience is needed to set an adequate aperture to cover the
near to far range with a circle of confusion. If aperture is set to
wide, then poor focus banding will be obvious in the mosaicked image.
(What DSLR lenses go to f/45? The Sigma 50mm f/2.8 EX DG Macro is one
such lens. It stops down to f/45 in the Canon mount, but for Nikon mount
only f/32). If you face this situation, you need to do smaller increments
in framing and crop out the out of focus sections of images.
- Compute time. Circa 2006, the 5-gigabyte photoshop image in Figure 1 took
14 hours to create on my 3-year old Pentium 4 1.8 GHz machine.
Now with 64-bit I7 machines this same number of frames only takes
a couple of minutes to mosaic.
- Control points. While programs like PTGui find most control
points, some hand refinements are sometimes necessary, and sometimes
the program may have trouble finding them (e.g.sky or other blank
areas). Finding control points by hand is tedious and takes time
(much like scanning film is tedious).
- Photoshop layers work. After assembly, some work may be
necessary in photoshop changing the blend lines due to
depth-of-field issues or movement of subjects in the scene.
Circa 2014, this seems less of an issue in my experience and with improvements in
software. One can mitigate this by controlling which image is on top
by quickly masking images in the mosaicking software.
- Moving subjects. I have found most moving subjects can be
accommodated in a mosaic with some planning, but there are pathologic
cases I can envision where mosaics would be very difficult and the
single frame of large format film is the way to go. Cases for the
film method might include many moving subjects (like animals
moving), beach scenes where waves are covering a large portion of
the scene, or fireworks. I have found with about 50% overlap that trees to
flowers moving in the wind are not an issue, especially with some
experience timing frames in the mosaic.
Look for an upcoming image I'll soon process: a giraffe raising its head
after drinking: I imaged at 10 frames per second to do a mosaic as I had no
time to change to a shorter focal length lens! A 2-second mosaic!
- Changing light. One problem I have found very annoying is
light changing from frame to frame. For example, a cloud shadow
moving over the scene, especially the foreground. I have had to
break of a mosaic sequence because light was changing too much
from frame to frame, even though the time between frames was only 4
or 5 seconds (including time to do mirror lock up). With hand held
operations, this can be mitigated by making the mosaic very fast.
Other Lessons
When doing landscape photos with a large depth of field, the depth of
field is usually from the foreground to the background, so that the
best focal point is changing vertically. Most pano-heads hold the
camera in portrait mode with the long dimension of the camera's image
plane vertically. This places the maximum dimension of the image plane
covering the most depth of field. A better way for such photos is to
place the camera in a horizontal, or landscape mode. This minimizes
the depth of field requirement for each frame in the image. The lesson is to
have a pano head that you can do either orientation and use the orientation
that minimizes depth of field requirements for any particular image.
When learning, I recommend to have about 50% overlap from frame
to frame. This helps to ensure that one does not have poor focus in some
areas with extreme depth of field.
Larger pixel cameras would enable fewer images to achieve the same final resolution.
For example, if an 8-megapixel camera requires 50 to 60 frames to surpass
4x5 film, then only 25 frames would be needed with a 16-magapixel camera.
Conclusions
I believe I have demonstrated I can make superior images with digital
mosaics than I can get with 4x5 Velvia film drum scanned. And I can do
this by carrying less weight in the field, and taking less time per
image in the field. There is a trade for field time and post
processing time, with digital helping reduce time in the field, so
more images can be acquired. But there is a cost in post processing
time though that time is greatly reduced circa 2012 and beyond with faster computers and
better software.
I will not get rid of my 4x5, as I feel I need it for
imaging large moving events (e.g. like frame filling fireworks).
But I will use my 4x5 much less, as I can get the quality I want
with digital mosaics most of the time, and including conditions
where I could not get a 4x5 image. 2015: I have not needed a 4x5 view camera
for several years.
See other examples in the MOSAICS GALLERY.
Large Format Gallery
If you find the information on this site useful,
please support Clarkvision and make a donation (link below).
References and Further Reading
http://www.largeformatphotography.info
.
http://www.largeformatphotography.info/how-to-focus.html
.
http://en.wikipedia.org/wiki/View_camera shows operation of a
view camera, including tilts.
.
Introduction to Large Format, Nature Photographers Online Magazine.
.
http://www.ptgui.com
.
http://clarkvision.com/articles/large_mosaics
First Published August 18, 2006.
Last updated December 31, 2015.