
Image Sharpening Introduction
by Roger N. Clark
This is the introduction to a series illustrating image sharpening methods.
The series:
Introduction to Sharpening
Unsharp Mask
Part 1
Part 2
Part 3.
Introduction
What is the best method for sharpening images?
Photographers usually want very sharp images, showing a lot of detail, unless
they want to show intentional blur. The are many methods for sharpening,
some more effective that others. Results from a particular sharpening
method will depend on the subject, the imaging system, and the nature
of the blur. Different algorithms and/or parameters used with
a particular method will produce better results on some images than
others. I have not seen one ideal method nor settings that work
universally with any method that sharpens all images. In my opinion,
the key to sharpening images is to learn a couple of tools well and try
different settings to find what works well on your images.
In this series of articles, I'll show examples of some pretty effective
sharpening methods, and compare them to traditional methods like unsharp mask.
I find that combinations of methods produce excellent sharpening results.
All images, text and data on this site are copyrighted.
They may not be used except by written permission from Roger N. Clark.
All rights reserved.
If you find the information on this site useful,
please support Clarkvision and make a donation (link below).
As with many things in life, there is more than one way to accomplish
a task, and this is true in the field of image sharpening.
One would think that sharpening methods would not be
controversial, but then this is the age of the internet. Some so-called
experts declare it their way is the only way and launch brutal
attacks on the internet against anyone who says another way works too.
In some cases, an "expert" has published a method, and they will defend
it to their grave regardless of evidence to the contrary. Many of these
so-called experts write books about using photoshop. Photoshop
is a great program and I use it a lot. While it is a great program
for image editing and with a good user interface, it is light
on advanced methods in image processing, particularly image sharpening
(as of February 2014 with photoshop versions CS5, CS6, and CC and earlier).
Consider the image pair shown in Figure 1: a blurry image of a crowned
crane on the left, and a sharper image of the same crowned crane on the
right. Which image do you think will produce the better output when
resized and tuned to the output medium? Some "experts" are adamant
that one should produce the resized image first before any sharpening.
So they would start with the blurry image. There is some logic in theory
why this may be so, but in practice problems are rarely encountered
(unless one images bar charts a lot), and sharpening before resizing
has other benefits.
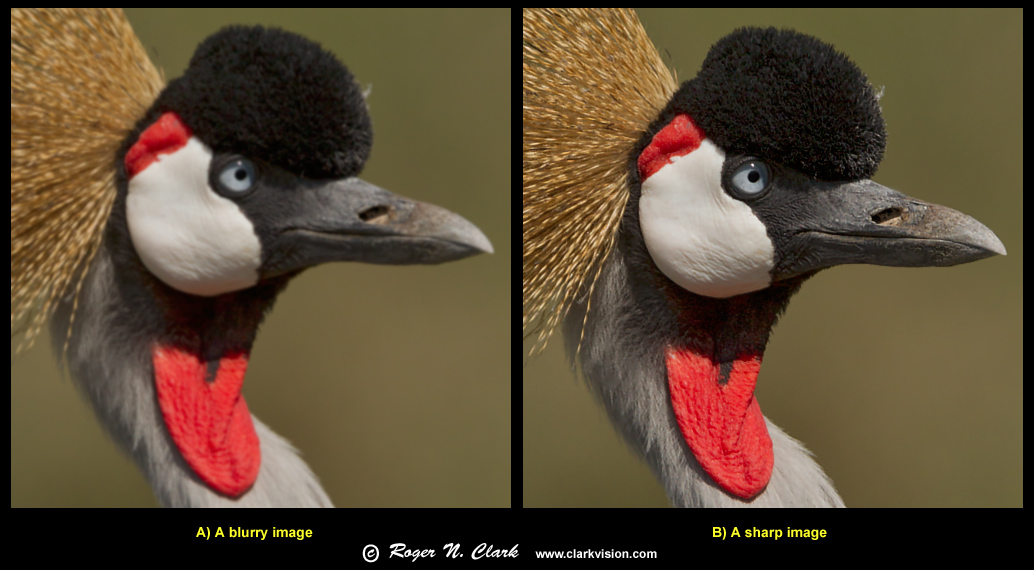
Figure 1. Crowned crane images. The sharp image on the right
was produced by advanced sharpening methods from the image on the left.
I come from a scientific background and have been doing digital image
acquisition and processing since 1976, including digital imaging with
silicon image detectors before any commercial digital cameras existed.
I write many of my own image processing algorithms and have hundreds
of publications of results. So I too am an expert. But expertise is
irrelevant. Experts can be wrong. Real-world results are what count. Follow the
math, science and data, not the experts. Follow the experts only as
far as their math, science and data illuminate the way, not what they
declare without solid evidence.
In a recent brutal encounter on a photography forum, the "experts"
declared that one must only sharpen after downsizing an image.
They didn't cite an actual reason for this methodology, but some certainly
have published that is the way it should be done. They cited other
experts as the reason why. I have emailed such experts and they
have yet to return an email. I simply asked what is the reason why
one should not produce the highest resolution sharpened image before
downsizing for web or print?
There is one image processing expert who has demonstrated downsampling
artifacts: Bart van der Wolf. See his examples
here: Down-sampling methods. Bart clearly shows that with
regularly spaced lines, one can get aliasing artifacts with pathologic cases.
These cases include where the line pairs approach pixel to pixel spacing.
The lesson is that if you are imaging bar charts or similar reglarly
spaced line subjects, you need to pre blur those subjects to avoid
aliasing in the down-sampled image. Most real world images do not have
such things. In those cases downsampling the sharp image produces
excellent results with no noticeable sampling artifacts. I have
yet to see aliasing artifacts in downsampled sharp images in any of
my photographs. One might think that such a pathologic case might be
the structure in bird's feathers. I have never observed this problem
in bird's feathers, animal hair, or any other subject. If I ever do,
I'll just add a little blur to those components of the sharpened image and proceed
with my downsampling.
Let's look at the logic of sharp images. Photographers seem obsessed with
sharpness. Buy a sharper lens. Buy a higher megapixel digital camera.
In the quest to obtain a sharper image, why not make it even sharper?
Why have an image blurred by lens aberrations, diffraction, focus error,
and out of the depth of field, then downsize to the desired output, only to then
sharpen? Downsizing is a resampling of the image, and by the statistical
positioning of an edge with the output pixels, the resizing will reduce
edge contrast (in other words, make it appear less sharp). But if one
starts with an blurry image, the downsized image will be blurrier than
if the image was sharper to begin with. So it makes no sense to only
sharpen after downsizing. Why not sharpen both before AND after resizing?
Indeed, with all the foot stomping and chest pounding of the "experts" saying
their way is the best and to do otherwise is just wrong, not one of them
has produced a better image, of either the original image, or a
sharper downsampled image, than I demonstrate in
Part
2 of my image sharpening series (there is a link to a 16-bit tif
file if anyone wants to try my challenge).
These experts are so insecure, that in a challenge one wannabe expert posed to me,
I did his challenge, but he only supplied a lossy compressed jpeg file,
used a different file for his own sharpening, and replaced components
by hand insertion of manufactured detail to make his results appear better.
And this person is a moderator on the photography site (I will not give
the site, but it can probably be googled).
I have also been attacked for using Gaussian profiles in my image deconvolution.
The wannabe "experts" said Gaussian profiles are not appropriate.
Yet there are thousands of scientific references to image sharpening
where Gaussians are used. I give references to many in
Part 2. With multiple factors contributing to blur in an image
(e.g. lens aberrations, diffraction, blur filter in the digital camera, atmospheric
turbulence), the resulting blur, especially when multiple sources contribute to
the blur, is close to Gaussian in
shape, as illustrated in Figure 2. The "experts" use photoshop's unsharp
mask, yet fail to realize that unsharp mask uses a Gaussian blur function!
The so called "experts" ignored these facts when I posted it and they
continued their attacks. It became quite amusing to watch their chest pounding.
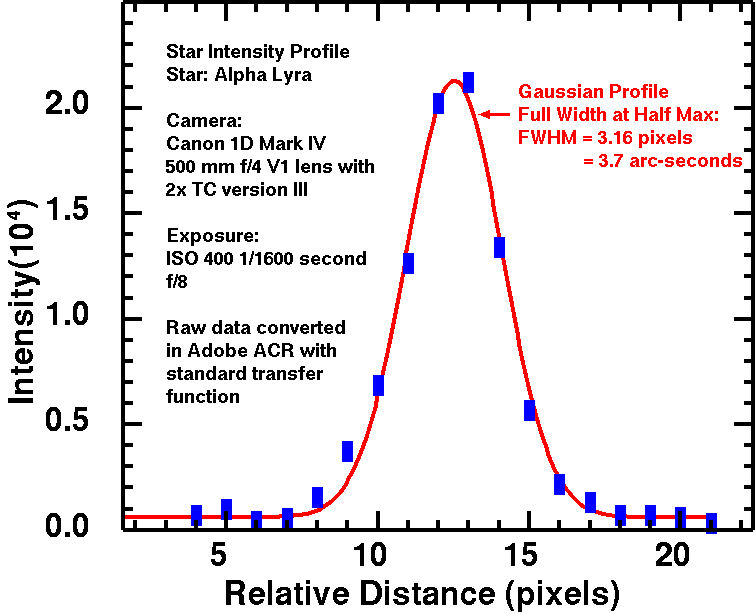
Figure 2. Profile of a well-focused star image. With the added
effects of lens aberrations, diffraction, the blur filter in the
digital camera, and atmospheric turbulence, the profile of a star is
close to Gaussian in shape. As one defocuses (e.g. error in focus,
or subject out of the depth of field), the profile becomes more
box shaped and a star image would look like a disk, but the
shape of the disk depends on the bokeh of the lens.
What is Sharpness?
The perception of sharpness in an image contains several factors.
One is how much change there is in intensity from pixel to pixel. For example
in the blurred image on the left in Figure 1, the transition from the
white feathers on the bird's cheek to the black feathers occurs over
several pixels. That means we perceive the image as soft. But a hard
edge (e.g. white to black in one pixel) is only part of sharpness.
Now look at the catchlight in the bird's eye. The catchlight also
appears soft. Same with bright spots on the bird's bill, and structure in
the birds feathers. These image components are spread out. It is not
just the transition over several pixels, but the size of the structures.
A sharp image includes small components, the fine detail, down to the limit of
vision. Thus, it is the size of the finest details that also contributes
to our perception of sharpness. An image that contains both high accutance
(edge contrast), and small details
is considered sharp. A high accutance image that does not contain fine
details might be considered sharp by some viewers but the image will pale
in comparison to the same scene that also contains the fine details.
In that comparison, the high accutance image would no longer be considered sharp
compared to the image with both high accutance and fine details.
Ideally, we could take an unsharp/blurry image and improve the fine details,
actually improving image resolution and accutance. It can be done.
Indeed, the image on the right in Figure 1 was produced from the blurry image
on the left in Figure 1.
Discussion
Contrary to some online posts that say it is not possible to
improve the resolution of images in post processing, there is a class
of algorithms that do just that. Explore the following articles that
describe different aspects of sharpening and producing sharp images of
different sizes. On each page, I give a link to the test image used in
the sharpening examples. Try it yourself and see which method works best
for you. I'll be particularly interested in hearing about your results
if you can produce better results than I show. This is not simply
a challenge. There are many routes to a sharp image. I have explored
some and present some examples in the following articles. You may well
find a better route. Let me know if you do. Also note, that different
blur conditions likely need different sharpening parameters/algorithms.
There is no one formula that works best for everything. If an "expert"
tells you otherwise, it tells you something about that "expert."
If you find the information on this site useful,
please support Clarkvision and make a donation (link below).
The Image Sharpening Series
Experiments with Unsharp Mask for Increasing Apparent Image Sharpness
Image Restoration Photography
Using Adaptive Richardson-Lucy Deconvolution
part 1
Image Restoration and Down Sampling
Using Adaptive Richardson-Lucy Image Deconvolution
Part 2
Image Restoration Photography:
Image Stacking and Adaptive Richardson-Lucy Image Deconvolution
Part 3: Imaging the Planet Saturn with a Telephoto Lens
This page URL
http://clarkvision.com/articles/image-sharpening-intro
First Published February 17, 2014.
Last updated February 17, 2014