ClarkVision.com
| Home | Galleries | Articles | Reviews | Best Gear | Science | New | About | Contact |
Evaluating Filter Quality
by Roger N. Clark
| Home | Galleries | Articles | Reviews | Best Gear | Science | New | About | Contact |
by Roger N. Clark
Introduction
Photographers often ask can putting a filter on my lens hurt image quality? The short answer is yes, but there are specific lenses where this can be more of a problem. There are also simple methods you can do to test the filter.
Evaluating Filters
Filters need to be of high optical quality in order not impact image quality. But the same filter will affect image quality differently on different lenses. Filters should be:
For example, A large diameter filter on a 20 mm wide angle f/4 lens only sees a little more than 20/4 or 5 mm diameter spot on the filter. The filter must be flat to within 1/2 wavelength over that 5 mm spot.
Figure 1 shows the shapes a filter may have. The larger the filter, the more difficult it is to manufacture. However, a filter on a wide angle, short focal length lens may show no degradation compared to the same filter on a telephoto lens. The reason is that the size of the aperture on a wide angle lens tends to be much smaller.
For example, consider a 20 mm f/2.8 lens with a 77 mm filter. The maximum aperture is 20/2.8 = 7.1 mm, quite small. So the lens sees only a very small portion of the entire filter. The 20 mm lens does not magnify the incoming light much so the filter can be wedge-shaped and curved over the entire surface, but over a 7-mm spot there is less of a problem.
Now consider that same filter on a 400 mm f/5.6 lens. The aperture of the 400 mm lens is 400 /5.6 = 71 mm, or almost the entire size of the 77 mm filter. Not only is a large portion of the filter viewed by the lens, but the 400 mm focal length has more magnification of the incoming light rays (400/20 = 20x more over the 20 mm lens). Both the size of the aperture and the magnification combine to require higher optical quality from the filter in order to deliver a good image.
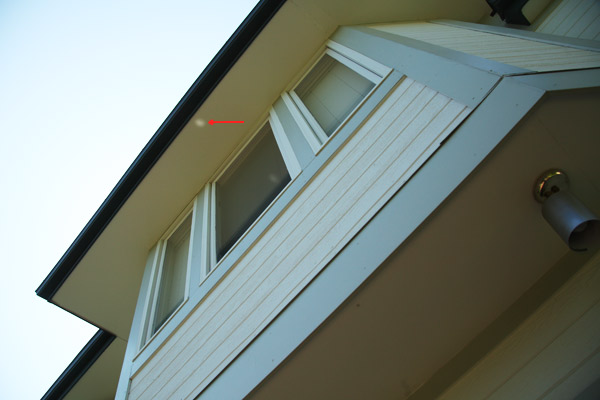
Let's investigate a 77 mm circular polarizing filter that was reportedly making images from a 400 mm f/5.6 lens soft. The first step is to use sunlight on a clear day to reflect light off of the filter onto something about 20 or more feet away. Figure 2 shows the sunlight reflected from the filter onto the eve of a house. The sun was about 15 degrees away. The reflection should be an ellipse. Because the sun is 1/2 degree in diameter, the reflection will appear with soft edges.
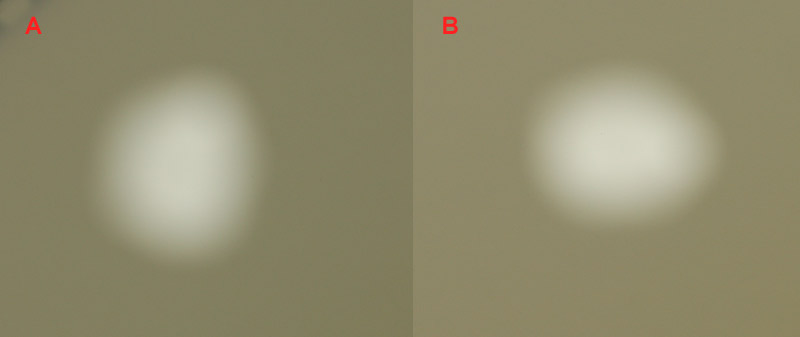
To evaluate if the filter surfaces are flat, reflect the sunlight onto a spot where you can evaluate the reflected image (Figure 3). Next, rotate the filter and see if the spot appears oblong or lumpy and that those details rotate as you rotate the filter. The filter in Figure 3 shows an oblong shape that rotates when the filter was rotated. This indicates the filter is not flat on that side. Also check reflection from the other side of the filter. The pattern shown in Figure 3 indicates that the filter would harm image quality on telephoto lenses. The pattern is not extreme enough to impact image quality when used on short focal length lenses.
Note on rotating the filter to reflect sunlight: do not do this with the filter on a camera and lens. If you do that, sunlight will be transmitted and focused into the camera and could cause damage.
The next step in the off-camera evaluation is to check the filter to see if it is wedge-shaped, or even a more complex shape. To do this, you need a micrometer. Measure around the edge of the filter every 45 degrees, like shown in Figure 4. Measurements of the 77 mm example filter show that the filter thickness is not the same at each position. The pattern indicates a saddle shape, which is not good for image quality. The flatness should be within 1/2 wavelength, but we see the variations are up to 35 wavelengths! Between the curvature previously measured, and the saddle-shape problems, it is no wonder this filter impacts image quality on telephoto lenses.

Photographic Examples
Of course the best way to evaluate filter quality is to test it on the lens that you intend to install the filter on. The most difficult test of a filter is on the longest telephoto lens you intend to use the filter on that uses the full aperture of the filter. Both the combination of the full aperture increases sensitivity to any imperfections in the filter and the long focal length which magnifies those imperfections will affect image quality. Here are a couple of comparisons.
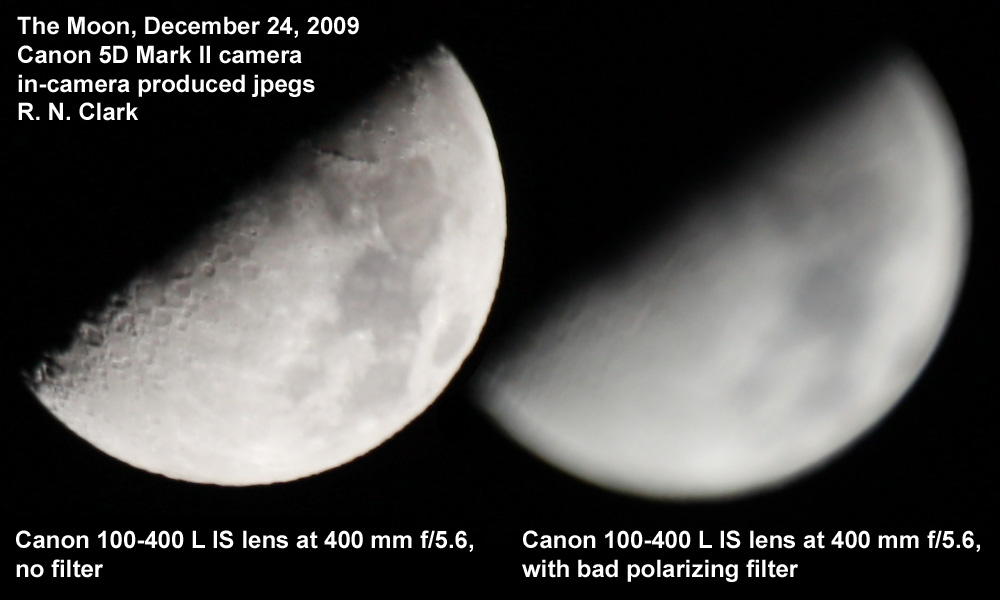
First let's test the filter we measured above. The thickness variations measured in Figure 4 tell us this filter greatly distorts the light passing through the filter. Figure 5 shows images of the Moon with and without the polarizing filter. Now is that a bad filter!
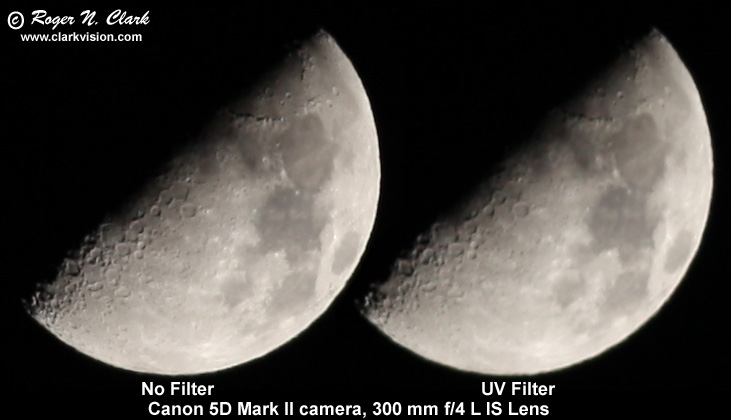
People often ask if good filters, even a UV or skylight filter can harm image quality. Figures 6a and 6b illustrate that the answer is yes, especially on telephoto lenses. The filter used in this test was a 77 mm Hoya HMC Super UV(0), a filter that is very high quality. But the large aperture 300 mm lens (at f/4 is a 75 mm aperture) uses the entire size of the filter and the long focal length magnifies the small departure from flatness. Such large filters, being so thin, are virtually impossible to keep flat. This same filter would produce effectively no degradation on a shorter focal length lens, due to both the smaller aperture and less focal length magnifying the optical imperfections.
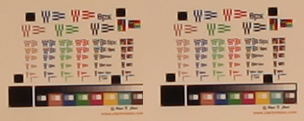
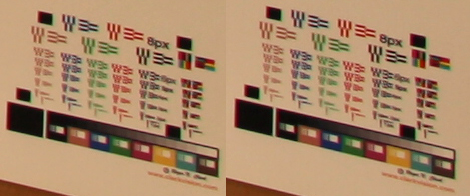
To illustrate the effects of magnification, or lack thereof, on filters and image quality, examine Figures 7a and 7b. These are images of a test chart at the center (Figure 7a) and lower right corner (Figure 7b). Each figure shows a pair of images, one with a UV filter and one without. The filter is the same type as used in the above 300 mm lens test on the Moon: Hoya HMC Super UV(0). There is essentially no difference in sharpness between the filter versus no filter images. Some small differences are due to variations where the test patterns fall on the Bayer filter array in each image. Images were obtained at ISO 100, 1 second exposure, on a carbon fiber tripod with mirror lockup. These tests show that quality filters like the Hoya HMC Super UV(0) do not affect image quality on short focal length lenses.
Conclusions
Filters can and do affect image quality on modern cameras, even high quality filters. The larger the physical aperture on the lens, and the longer its focal length, the greater demand there is on filter quality. Thin filters are more likely to suffer from distortion as they are easier to bend and harder to manufacture with high optical quality. On shorter focal length, wide angle lenses, the apertures are small and the focal lengths shorter so that optical imperfections are not magnified like they are on telephoto lenses. Thus the same filter that may degrade the images from a telephoto lens may be just fine on a short focal length lens.
| Home | Galleries | Articles | Reviews | Best Gear | Science | New | About | Contact |
http://clarkvision.com/articles/evaluating_filter_quality
First Published August 18, 2009
Last updated December 27, 2009